Quantcast
Channel: Telerik Blogs | Testing
Viewing all 339 articles
Browse latest View live

Telerik and Kendo UI R2 2020 Release is Here!

$
0
0

The second major release of 2020 for Telerik and Kendo UI developer tools is here, and it’s packed with a ton of gems: new and exciting components, features and improvements to fully equip every developer for every .NET and JavaScript project! Read on for more details.

Our amazing developer teams at Progress have been hard at work, doing what they can in the best way possible. Our goal is to enable you as developers to be well-equipped with sleek, unified and customizable UI that is compatible with the latest and greatest technologies so that you can build modern, feature-rich and professionally designed web, desktop and mobile applications in less time and with less effort. With the backing of our legendary support team, which consists of the same developers who build the products, and a ton of resources and trainings you can rest assured that you have a stable partner to rely on for your software development journey.

I am super excited to announce that today, the R2 2020 release of Telerik and Kendo UI is LIVE! In addition, I am pleased to share the newly released Telerik and Kendo UI mascots. Your familiar Ninja and Kendoka have evolved but remain your faithful companions. You’ll also notice updated branding on our homepage (www.telerik.com), plus a refreshed UX to help you get around with ease. 

Now let’s dive deeper into what R2 2020 brings, so, grab a cup of coffee, as there is plenty to explore.

Note: Links to individual product blog posts will go live as the posts do today.

Updates in the Telerik R2 2020 Release

The New Era of .NET is Coming! Telerik Controls Now Feature Support for .NET 5 Preview, Blazor WebAssembly, and 40+ Blazor Native Components!

Learn more about newly released gems in the .NET product line below.

Telerik Release R2 2020_1170x285

Web Development

Telerik UI for Blazor with 40+ Native Components

  • Telerik UI for Blazor is compatible with the latest release of Blazor WebAssembly
  • New components: Upload, ListView, MultiSelect, DateRangePicker, Drawer, Pager, Tooltip and CheckBox
  • New Grid features: Persist State, Support for Nested Models, Export to Excel, Column Visualization, Grid Frozen Columns, Grid Aggregates, Grid Autogenerated Columns, Grid Storable and Individual Column, Grouping from Code and Column and Group Header Template
  • New Scheduler improvements: Recurring Appointments, Month View
  • Visual Studio Code Template Wizard: Provides predefined templates for creating Telerik UI for Blazor in Visual Studio Code
  • Visual Studio Convert Project Wizard: Convert Blazor projects with ease to Telerik UI for Blazor
  • Read More: Release blog post | product page

Telerik UI for ASP.NET Core & Telerik UI for ASP.NET MVC

  • Telerik UI for ASP.NET Core ships with support for latest preview of .NET 5
  • New Components: Form, Stepper and TileLayout
  • Grid Grouping improvement: DataSource Server-Side Remote Grouping
  • Scheduler component enhancements: Virtualization, Set different workday and more
  • Floating Label for Inputs
  • New Rendering for DateTimePicker and TimePicker
  • Read More: Release ASP.NET Core blog post | product page
  • Read More: Release ASP.NET MVC blog post I product page

Telerik UI for ASP.NET AJAX  

  • New components: PDF Viewer and Timeline
  • Spreadsheet improvements
  • Read More: Release blog post | product page

Desktop Development

Telerik UI for WPF

  • Telerik UI for WPF ships with support for.NET 5 Preview
  • .NET Core Converter which will enable converting WPF projects to .NET Core
  • New components: Callout and Notify Icon control
  • Sub-menu support for Navigation View
  • Keyboard search for TreeView and PropertyGrid
  • Custom time indicator support in ScheduleView
  • Read More: Release blog post | product page

Telerik UI for WinForms

  • Telerik UI for WinForms ships with support for.NET 5 Preview
  • .NET Core Converter which will enable converting WinForms projects to .NET Core
  • Support for Vector images in all controls
  • New components: Validation provider
  • Multi-shape annotations for ChartView
  • BrowseEditor integration in FileDialogs
  • Read More: Release blog post | product page

Mobile Development

Telerik UI for Xamarin

  • New Components: DatePicker, TimePicker and TimeSpanPicker
  • Sticky group headers for ListView
  • Improvements in Calendar – API to open end edit the edit appointment UI and built in add appointment button
  • Read More: Release blog post | product page

Reporting and Report Management Solutions

Telerik Reporting and Report Server

  • Improved web-based report designer
  • New barcode symbologies
  • Base64-encoded Images Support in PictureBox Item
  • Ability to freeze Table/Band Header in Web-based report viewers
  • Blazor Report Viewer V.2.0 in Telerik Reporting
  • Telerik Reporting runtime supports .NET 5 Preview
  • *Telerik Reporting features report viewers for Blazor, ASP.NET Core, ASP.NET MVC, ASP.NET Web Forms, WPF, WinForms, HTML5, Angular, React, and Vue apps.
  • Read More: Release blog post | product page (Reporting / Report Server)

Automated Testing and Mocking Tools

Telerik JustMock

  • Implement a Visual Studio window for visualizing the mocked objects during debug
  • Improve the loading time of JustMock Visual Studio extension
  • Read More: Release blog post | product page

Telerik Test Studio Dev Edition  

  • Web components support which ensures seamless and stable test automation
  • Read More: Product page

Looking Forward to WinUI 3.0

Microsoft is working on a new version of WinUI 3.0, which will deliver a lot more possibilities for desktop developers. Are you interested in seeing what we are cooking with WinUI 3.0? Subscribe here and you will receive the first bits later this month.

Updates in the Kendo UI R2 2020 Release

Kendo UI has Your Back with New Native UI Components and Features for Angular, React, jQuery and Vue!

Learn more about newly released gems in JavaScript product line below (or check out this blog post).

Kendo UI Release R2 2020_1170x285

Kendo UI for Angular

  • New components: Stepper Component, External Drop Zone Component, Pager Component and Label Component
  • Design Guidelines for Building Forms in Angular
  • TreeList: v1 Officially released
  • TreeList: Virtualization, Selection, Keyboard Navigation, Accessibility
  • TreeView: Load More Button
  • Grid improvements: Persistence for Expand and Collapse state of detail rows
  • Conversational UI: Support for the DialogFlow v2 API
  • Read More: Release blog post | product page

KendoReact

  • New components: ListView, Progress Bar, Chunk Progress Bar, Stepper, Label, Floating Label, Hint and Error, Radio Button, Radio Group, Range Slider, FormElement and FieldWrapper
  • Design Guidelines for Building Forms in React
  • TreeList Improvements: Virtualization, Built-In Pager, Column Menu, Drag & Drop, Aggregates
  • Grid Improvements: Checkbox Filter
  • Scheduler Improvements: Header & Footer Custom Rendering
  • Form Improvements: Form-Level Validation, FieldArray
  • Drawer Improvements: Custom Rendering
  • Read More: Release blog post | product page

Kendo UI for jQuery

  • New components: Form, Stepper, TileLayout
  • Scheduler: Virtualization, Google Calendar integration, Search & Filter options
  • DataSource: Server-side Remote Grouping support
  • Validator: New Validation Summary, Inline validation rendering support
  • Inputs: Floating Label support
  • DateTimePicker & TimePicker: New Rendering Options
  • Read More: Release blog post | product page

Kendo UI for Vue

  • New components: Native Calendar, Native DateInput, and Native DatePicker
  • Native Grid Improvements: Footer Cell and Extensive bug resolution effort
  • Preparation for Vue 3.0
  • Read More: Release blog post | product page

Sign Up for the Release Webinars

Telerik Kendo Release-2

Seeing is believing, so register to see all the new features – the webinars are coming up fast! It will help you to follow along easily if you download the latest release here.

To see what’s new in Telerik products, sign up to join either or both of our webinars on Thursday, May 21:

What’s New in Web Development Solutions – 11.00 AM ET

  • Telerik UI for Blazor
  • Telerik UI for ASP.NET Core
  • Telerik UI for ASP.NET MVC
  • Telerik UI for ASP.NET AJAX 

Register Here

What’s New in Desktop, Mobile, Reporting and Mocking solutions– 12.00 AM ET

  • Telerik UI for WPF
  • Telerik UI for WinForms
  • Telerik UI for Xamarin
  • Telerik Reporting and Report Server
  • Telerik JustMock

Register Here

To see what’s new in Kendo UI, sign up to join any or all 4 webinars on Tuesday, May 19:

  • What’s New in Kendo UI for Angular - 11:00 AM ET
  • What’s New in KendoReact - 11:30 AM ET
  • What’s New in Kendo UI for jQuery - 12:00 PM ET
  • What’s New in Kendo UI for Vue - 12:30 PM ET

Register Here

Thank You

We recently asked our customers to describe their experience with our tools and support. Thank you for the amazing responses! We were blown away and thought it would be fun to organize your responses in the language that binds us all together – code :). Here it is, using our customers’ own words. As always, you make what we do possible.

DevCraft Customer Words

Thank YOU for your trust in us!

About DevCraft 

Telerik DevCraftis the finest software developer tools collection across .NET and JavaScript technologies, which includes modern, feature-rich and professionally designed UI components for web, desktop and mobile applications, reporting and report management solutions, document processing libraries, automated testing and mocking tools from the Telerik and Kendo UI suites. DevCraft will arm you with everything you need to deliver outstanding applications in less time and with less effort. With the backing of our legendary support team, which consists of the developers who build the products, and a ton of resources you can rest assured that you have a stable partner to rely on for your everyday challenges in your software development journey.


Web-Based Results and Much More in the Latest Test Studio Release

$
0
0

Test Studio has been providing outstanding test automation capabilities to QA engineers for more than 10 years now. In the latest release, we provide even more value not only to the QA but to all other stakeholders in a project – PM, Developer, Management, etc. Let me present to you the Executive Dashboard.
Learn more about it and what else is new.

Executive Dashboard

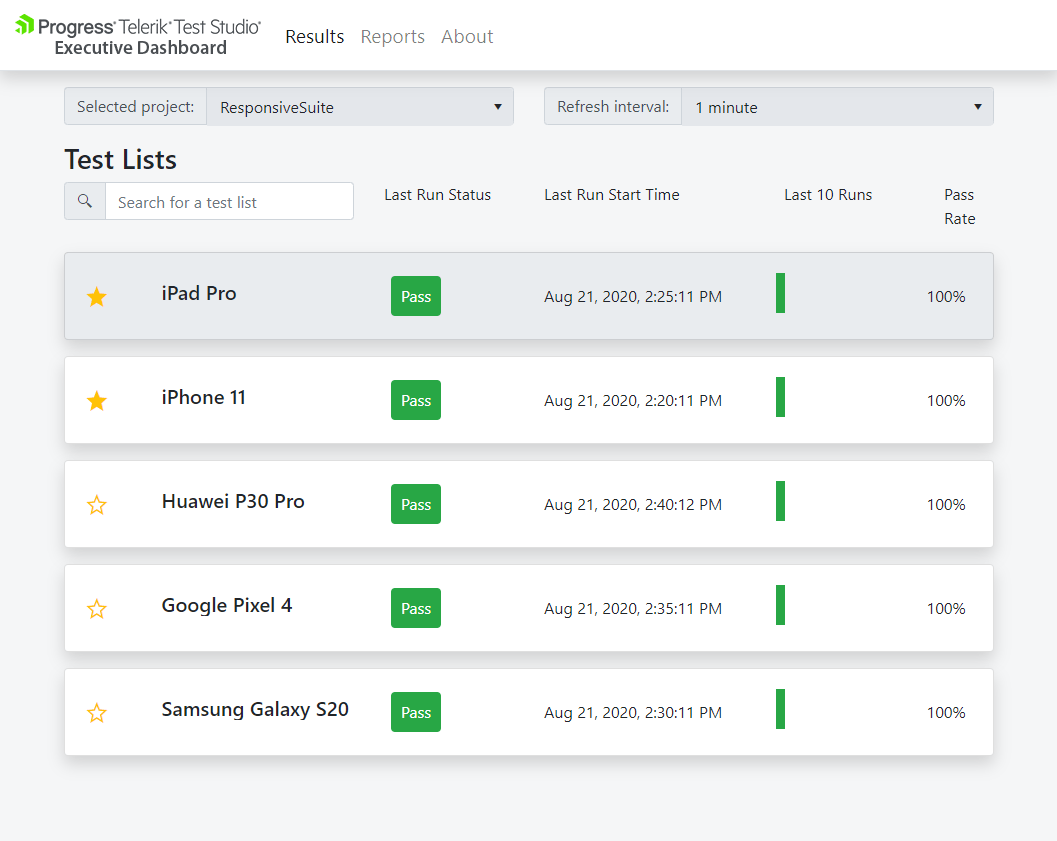
The Executive Dashboard is a brand-new web-based Results Server. It displays all results from any Test Studio project and test list that is configured. Anyone on the team can access it without the need for a Test Studio license. This means that if a stakeholder wants to monitor the product health through the scheduled automated test lists results, he/she can do it anytime in the browser, on the desktop or mobile. Having such visibility and a live results feed can greatly improve the team's efficiency.

The Executive Dashboard is also super helpful for the QA engineer who can drill down into runs, tests and steps, investigating any failures or script issues.

If you run some tests lists locally, don't worry, you can upload them anytime and they will immediately appear in the dashboard.

In terms of features, you can mark favorite test lists which will always appear on top, there is a configurable auto-refresh interval, sortable Test List and Run columns and much more.

Next up is to add Reports into the Executive Dashboard in 2020.

Dashboard

Blazor Applications and Telerik UI for Blazor Support

Blazor is the latest Web UI framework developed by Microsoft and based on C#, HTML, Razor. It runs in the browser via WebAssembly. It will provide an alternative to JavaScript for building rich web apps. This is why Blazor is gaining a lot of traction, promising to be the next big thing in web development.

Progress has always been on top of new technologies and this time we are not falling behind. We have released a rich and powerful set of Blazor components, helping developers build beautiful applications with shorter development cycles, quick iterations and faster time to market.

Test Studio marks the beginning of the Blazor test automation race by joining first and and leading it. If you wonder, “Now how I am going to test these new Blazor apps?” don’t worry, we've got you covered. Test Studio supports any Blazor web application and on top of that has exclusive support for Telerik Blazor components. The party that best understands the internals of a component is the party that built it. Our translators open the element and expose the specific and custom properties for actions automation and verifications. With this, test creation is easier, faster and no additional coding is needed.

The supported Telerik UI for Blazor components are TreeView, TimePicker, Pager, NumericTextBox, List, Grid, DropdownList, DatePicker, DateInput, Button.

Stay tuned for more in 2020!

blazort_870x220

Test Lists in Test Studio Dev Edition (Visual Studio Plugin)

One of the main Test Studio goals is to boost tester-developer collaboration. Along with the standalone product, we provide a Visual Studio plugin also called Test Studio Dev Edition. Dev Edition is perfect for the developer or the Automation QA who wants to make use of Test Studio’s great productivity features in combination with Visual Studio's IDE. According to our developer customers, there was one major functionality that was missing in Test Studio Dev Edition – Test Lists. Now they are a fact inside the product. You can create test lists (collections/suites of tests) in the Visual Studio plugin to run a certain group of tests or include them in your CI/CD pipeline.

VSTestLists_Large

Images as a Primary Element Identification

Test Studio has a unique and bulletproof way of identifying web elements – a combination of DOM-based find logic and images. This is a stable solution to some of the toughest test automation challenges. We are introducing a new option here – the ability to use Images as primary element identification. So, if you know that in a certain scenario the DOM-based logic will not work because of dynamically generated elements or anything else, and you need to fallback to Image, you can choose the image to be the primary identification. Test Studio will first look for the image, so it will save time by not first waiting for the DOM find logic to fail.

All this sounds awesome, right! But wait, there is more. On top of the standard product bug fixes, we improved our code editor inside Test Studio adding search, replace, comment, uncomment options. Load Testing custom dynamic targets now is enhanced with the ability to define shared variables for headers. See the full release notes here.

Happy testing!

Try Test Studio

Check Automation Results Easily with Test Studio’s New Executive Dashboard

$
0
0

Presenting the Test Studio Executive Dashboard - a web feature to monitor automation results. Anybody on the project can use the Dashboard to monitor automation, and thus product health, from any kind of device.

Hey there! I am so excited to share more details with you about one of the newest and coolest Test Studio features from the R3 2019 release. Along with nice features for QAs—such as Blazor Applications support and the ability to create and execute Test Studio test lists in Visual Studio—we’ve decided to please the other stakeholders in a project (like PM and Management) and provide them the ability to check the automation results live via a web page.

Let me introduce you to the Executive Dashboard.

Until now, in order to check Test Studio results you had to have either Test Studio or Results Viewer installed or have them send via email. This made it harder, especially for the non-technical people, to review the results, make a report and so on.

With the Executive Dashboard anyone with the link within the same network can monitor the automation results, drill down test lists and test results and review the exceptions of the failed tests.

The index page of the Executive Dashboard looks like this:

Executive Dashboard

It works in all browsers and has a responsive design so you can load the page using your mobile phone or tablet.

Prerequisites for the Executive Dashboard

The Executive Dashboard pulls all the data from the scheduling database, and in order to take advantage of this feature you will need the following prerequisites:

  • Storage Service
  • Scheduling Server
  • Executive Dashboard

For the sake of this example we will perform an all-in-one installation, this means that all the features can be installed on different machines, depending on your preferences.

Once you launch the Test Studio installer and accept the license agreement, click on the Customize button to turn on the features mentioned above.

Customize

To perform the installation you can follow the installation procedure as described in this KB article. Once you perform the installation you need to configure the Scheduling environment and execute a test list remotely to have the results appear in the Executive Dashboard.

Refer to this KB article for more information on setting up the scheduling and executing a test list remotely.

You may have a question, “What about local results?” and that’s a reasonable one. Of course we have solution for this. In Test Studio you have the option to upload any local results in the scheduling database and have it displayed in the Executive Dashboard.

You simply navigate to the result in question, select it and click on Publish to Server button.

Note: You should have the scheduling set up as shown in the KB article above, otherwise thePublish to Server button will be disabled.

Publish to server

You get confirmation that publishing the run result succeeded:

Publishing succeeded

And the result appears on top in the Executive Dashboard.

LocalRun uploaded in Executive Dashboard

3 Useful Features You Should Know about the Executive Dashboard

  1. The Executive Dashboard displays test list runs per project. You can drill down to Test List results and Test Results by selecting the Test List run. If you have multiple projects use Selected Project dropdown to switch between projects:

    Select Project

  2. You can add a test list run to favorites by clicking the star icon on the left. The run results are sorted by default by Last Run Start Time, until a favorite is added. Then it is displayed on the top no matter the Last Run Start Time. The rest of the runs use the default sorting.

    add run to favorites

    As you can see from the screenshot above, even though the last run of Conditions is executed on the 25th of September, it is added to favorites so it's placed on top of the runs executed on October 4th. Even if you switch projects the favorite runs are saved per project.

  3. You can use the refresh interval dropdown to select the time on how often the list of the run has to be refreshed. This is added to make things easier for you by eliminating the need to manually refresh. This is extremely helpful if you have dedicated screens/monitors for test results, so this way you can monitor results without taking any additional action.

Along with monitoring the automation results, in the Executive Dashboard you can drill down into each run, test list or single test, to investigate any failures and issues.

You can learn more about the Executive Dashboard over on this this KB article.

QA Professionals and "Framework Fatigue"

$
0
0

How does framework fatigue affect you as a quality professional?

Framework fatigue is frequently associated with software architects, managers, and of course frontend developers. The term has grown in popularity as new JavaScript libraries and frameworks emerge resulting in intra-team factions, endless evaluations and when a framework is finally selected – the uncertainty that a future-proof path has been selected.

How does this uncertainty impact you as a quality professional? Have you been invited to the table for this conversation? Do you know if the tools you use today provide future agility for the uncertainty that lies ahead?

When your colleagues in engineering finally do select a framework, they are likely to leverage components to ensure optimal performance and visual appeal of the UI. Ensuring test-automation compatibility up front for any and all components used can save quality professionals time and frustration.

A good example is the growing adoption of Blazor, which is a free and open source framework developed by Microsoft, allowing developers to create web applications using C# instead of JavaScript. We’ve seen traction not only in the adoption of Blazor itself, but also in the adoption of 3rd party native component suites such as our own Telerik UI for Blazor.

Check in with your counterparts in development – see if they are planning to adopt a new framework, or productivity components. If so, ensure that the automation platform you use will be compatible.

When it comes to compatibility, our popular solution for web automation, Telerik Test Studio, aims for day zero support of browser updates and provides native support for web frameworks and components – from Blazor to React and everywhere in between.

Read about the latest release which includes support for our Blazor components or watch the recent webinar where our team takes you through all the new features.

Testing Dynamic Forms in Angular

$
0
0

Learn how to create a dynamic form in Angular and then create tests for the form to ensure it works as expected.

This article will cover testing of dynamic forms in Angular. Dynamic forms in Angular are forms that are created using reactive form classes like Form Group and Form Controls. We will write tests for these forms to ensure that they function as intended.

For this article, we’ll be testing a sign-up form. The form is generated dynamically by passing an array of objects describing the input elements to the component; then a FormControl will be generated for each element before the form is grouped using FormGroup.

To get started, you have to bootstrap an Angular project using the CLI. To follow this tutorial a basic understanding of Angular is required. Please ensure that you have Node and npm installed before you begin. If you have no prior knowledge of Angular, kindly follow the tutorial here. Come back and finish this tutorial when you’re done.

Initializing Application

To get started, we will use the CLI (command line interface) provided by the Angular team to initialize our project.

First, install the CLI by running npm install -g @angular/cli. npm is a package manager used for installing packages. It will be available on your PC if you have Node installed, if not, download Node here.

To create a new Angular project using the CLI, open a terminal and run:
ng new dynamic-form-tests

Enter into the project folder and start the Angular development server by running ng serve in a terminal in the root folder of your project.

Creating Sign-up Form

To get started, we’ll set up the sign-up form to get ready for testing. The form itself will be rendered by a component separate from the App component. Run the following command in a terminal within the root folder to create the component:

    ng generate component dynamic-form

Open the dynamic-form.component.html file and copy the following content into it:

    <!-- src/app/dynamic-form/dynamic-form.component.html -->
    
    <form [formGroup]="form" (submit)="onSubmit()">
      <div *ngFor="let element of formConfig">
        <div [ngSwitch]="element.inputType">
          <label [for]="element.id">{{ element.name }}</label
          ><span *ngIf="element?.required">*</span>
          <br />
          <div *ngSwitchCase="'input'">
            <div *ngIf="element.type === 'radio'; else notRadio">
              <div *ngFor="let option of element.options">
                <input
                  [type]="element.type"
                  [name]="element.name"
                  [id]="option.id"
                  [formControlName]="element.name"
                  [value]="option.value"
                />
                <label [for]="option.id">{{ option.label }}</label
                ><span *ngIf="element?.required">*</span>
              </div>
            </div>
            <ng-template #notRadio>
              <input
                [type]="element.type"
                [id]="element.name"
                [formControlName]="element.name"
              />
            </ng-template>
          </div>
          <select
            [name]="element.name"
            [id]="element.id"
            *ngSwitchCase="'select'"
            [formControlName]="element.name"
          >
            <option [value]="option.value" *ngFor="let option of element.options">{{
              option.label
            }}</option>
          </select>
        </div>
      </div>
      <button>Submit</button>
    </form>

We use the ngSwitch binding to check for the input type before rendering. The inputType of the select element is different, so it is rendered differently using the *ngSwitchCase binding. You can add several inputTypes and manage them using the *ngSwitchCase. The file input element, for example, might be rendered differently from the other input elements. In that case, the inputType specified can be file.

For each input element, we add a formControlName directive which takes the name property of the element. The directive is used by the formGroup to keep track of each FormControl value. The form element also takes formGroup directive, and the form object is passed to it.

Let’s update the component to generate form controls for each input field and to group the elements using the FormGroup class. Open the dynamic-form.component.ts file and update the component file to generate form controls for each input and a form group.

    // src/app/dynamic-form/dynamic-form.component.ts
    
    import { Component, OnInit, Input } from '@angular/core';
    import { FormControl, FormGroup } from '@angular/forms'
    @Component({
      selector: 'app-dynamic-form',
      templateUrl: './dynamic-form.component.html',
      styleUrls: ['./dynamic-form.component.css']
    })
    export class DynamicFormComponent implements OnInit {
      constructor() { }
      @Input()formConfig = []
      form: FormGroup;
      userGroup = {};
    
      onSubmit(){
        console.log(this.form.value);
      }
      ngOnInit(){
        for(let config of this.formConfig){
          this.userGroup[config.name] = new FormControl(config.value || '')
        }
        this.form = new FormGroup(this.userGroup);
      }
    }

The component will take an Input (formConfig) which will be an array of objects containing information about each potential input. In the OnInit lifecycle of the component, we’ll loop through the formConfig array and create a form control for each input using the name and value properties. The data will be stored in an object userGroup, which will be passed to the FormGroup class to generate a FormGroup object (form).

Finally, we’ll update the app.component.html file to render the dynamic-form component and also update the app.component.ts file to create the formConfig array:

    <-- src/app/app.component.html -->
    
    <section>
        <app-dynamic-form [formConfig]="userFormData"></app-dynamic-form>
    </section>

Next is the component file. Open the app.component.ts file and update it with the snippet below:

    import { Component, OnInit } from '@angular/core';
    @Component({
      selector: 'my-app',
      templateUrl: './app.component.html',
      styleUrls: ['./app.component.css']
    })
    export class AppComponent {
      userFormData = [
        {
          name: 'name',
          value: '',
          type: 'text',
          id: 'name',
          inputType: 'input',
          required: true
        }, {
          name: 'address',
          value: '',
          type: 'text',
          id: 'address',
          inputType: 'input',
        }, {
          name: 'age',
          value: '',
          type: 'number',
          id: 'age',
          inputType: 'input',
        }, {
          name: 'telephone',
          value: '',
          type: 'tel',
          id: 'telephone',
          inputType: 'input',
        }, {
          name: 'sex',
          type: 'radio',
          inputType: 'input',
          options: [
            {
              id: 'male',
              label: 'male',
              value: 'male'
            },
            {
              id: 'female',
              label: 'female',
              value: 'female'
            }
          ]
        }, {
          name: 'country',
          value: '',
          type: '',
          id: 'name',
          inputType: 'select',
          options: [
            {
              label: 'Nigeria',
              value: 'nigeria'
            },
            {
              label: 'United States',
              value: 'us'
            },
            {
              label: 'UK',
              value: 'uk'
            }
          ]
        },
      ]
    }

The userForm array contains objects with properties like type , value, name. These values will be used to generate appropriate fields on the view. This lets us add more input fields in the template without manually updating the template. This array is passed to the dynamic-form component.

Don’t forget that to use Reactive Forms, you have to import the ReactiveFormsModule. Open the app.module.ts file and update it to include the ReactiveFormsModule:

    // other imports ...
    import { FormsModule, ReactiveFormsModule } from '@angular/forms';
    
    @NgModule({
      imports:      [
        // ...other imports 
        ReactiveFormsModule 
      ],
      //...
    })
    export class AppModule { }

Testing the Form

When generating components, Angular generates a spec file alongside the component for testing. Since we’ll be testing the dynamic-form component, we’ll be working with the dynamic-form.component.spec.ts file.

The first step is to set up the test bed for the component. Angular already provides a boilerplate for testing the component, and we’ll simply extend that. Open the dynamic-form.component.spec.ts and update the test bed to import the ReactiveFormsModule that the component depends on:

    import { async, ComponentFixture, TestBed } from '@angular/core/testing';
    import { ReactiveFormsModule } from '@angular/forms';
    import { DynamicFormComponent } from './dynamic-form.component';
    
    describe('DynamicFormComponent', () => {
      let component: DynamicFormComponent;
      let fixture: ComponentFixture<DynamicFormComponent>;
    
      beforeEach(async(() => {
        TestBed.configureTestingModule({
          declarations: [ DynamicFormComponent ],
          imports: [ ReactiveFormsModule ],
        })
        .compileComponents();
      }));
    
      beforeEach(() => {
        fixture = TestBed.createComponent(DynamicFormComponent);
        component = fixture.componentInstance;
        fixture.detectChanges();
      });
    
      it('should create', () => {
        expect(component).toBeTruthy();
      });
    });

We’ll be testing our form using the following cases:

  • Form rendering: here, we’ll check if the component generates the correct input elements when provided a formConfig array.
  • Form validity: we’ll check that the form returns the correct validity state
  • Input validity: we’ll check if the component responds to input in the view template
  • Input errors: we’ll test for errors on the required input elements.

To begin testing, run the following command in your terminal: yarn test or npm test

Form Rendering

For this test, we’ll pass an array of objects containing data about the input elements we wish to create, and we’ll test that the component renders the correct elements. Update the component’s spec file to include the test:

    describe('DynamicFormComponent', () => {
      // ... test bed setup
    
    beforeEach(() => {
        fixture = TestBed.createComponent(DynamicFormComponent);
        component = fixture.componentInstance;
        component.formConfig = [
          {
            name: 'name',
            value: '',
            type: 'text',
            id: 'name',
            inputType: 'input',
            required: true
          }, {
            name: 'address',
            value: '',
            type: 'text',
            id: 'address',
            inputType: 'input',
          },
        ]
        component.ngOnInit();
        fixture.detectChanges();
      });
    
      it('should render input elements', () => {
        const compiled = fixture.debugElement.nativeElement;
        const addressInput = compiled.querySelector('input[id="address"]');
        const nameInput = compiled.querySelector('input[id="name"]');
    
        expect(addressInput).toBeTruthy();
        expect(nameInput).toBeTruthy();
      });
    });

We updated the test suite with the following changes:

  1. We assigned an array to the formConfig property of the component. This array will be processed in the OnInit lifecycle to generate form controls for the input elements and then a form group.
  2. Then we triggered the ngOnInit lifecycle. This is done manually because Angular doesn’t do this in tests.
  3. As we’ve made changes to the component, we have to manually force the component to detect changes. Thus, the detectChanges method is triggered. This method ensures the template is updated in response to the changes made in the component file.
  4. We get the compiled view template from the fixture object. From there, we’ll check for the input elements that should have been created by the component. We expected two components — an address input and a name input.
  5. We’ll check if the elements exist using the toBeTruthy method.

Form Validity

For this test, we’ll check for the validity state of the form after updating the values of the input elements. For this test, we’ll update the values of the form property directly without accessing the view. Open the spec file and update the test suite to include the test below:

    it('should test form validity', () => {
        const form = component.form;
        expect(form.valid).toBeFalsy();
    
        const nameInput = form.controls.name;
        nameInput.setValue('John Peter');
    
        expect(form.valid).toBeTruthy();
      })

For this test, we’re checking if the form responds to the changes in the control elements. When creating the elements, we specified that the name element is required. This means the initial validity state of the form should be INVALID, and the valid property of the form should be false.

Next, we update the value of the name input using the setValue method of the form control, and then we check the validity state of the form. After providing the required input of the form, we expect the form should be valid.

Input Validity

Next we’ll check the validity of the input elements. The name input is required, and we should test that the input acts accordingly. Open the spec file and add the spec below to the test suite:

    it('should test input validity', () => {
        const nameInput = component.form.controls.name;
        const addressInput = component.form.controls.address;
    
        expect(nameInput.valid).toBeFalsy();
        expect(addressInput.valid).toBeTruthy();
    
        nameInput.setValue('John Peter');
        expect(nameInput.valid).toBeTruthy();
    })

In this spec, we are checking the validity state of each control and also checking for updates after a value is provided.

Since the name input is required, we expect its initial state to be invalid. The address isn’t required so it should be always be valid. Next, we update the value of the name input, and then we test if the valid property has been updated.

Input Errors

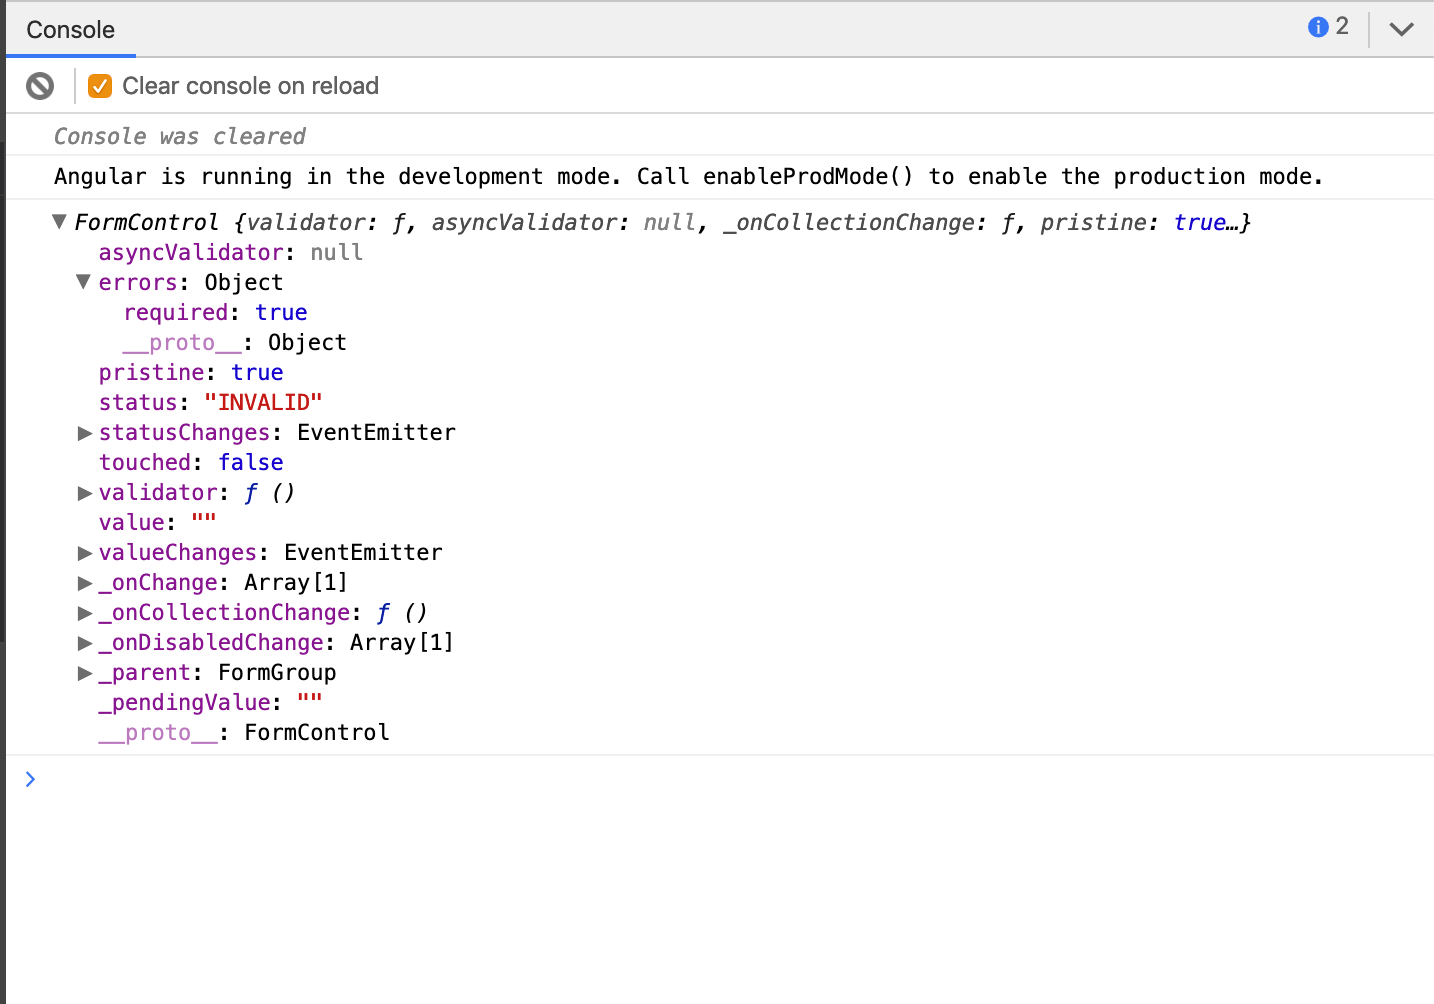
In this spec, we’ll be testing that the form controls contain the appropriate errors; the name control has been set as a required input. We used the Validators class to validate the input. The form control has an errors property which contains details about the errors on the input using key-value pairs.

s_B627623ACECF3DCB4B58A57BA31AF692B356F096E54A587B9792CBF5F5D10C9C_1551623628778_Screenshot+2019-03-03+at+3.33.33+PM

The screenshot above shows an example of how a form control containing errors looks. For this spec, we’ll test that the required name input contains the appropriate errors. Open the dynamic-form.component.spec.ts file and add the spec below to the test suite:

    it('should test input errors', () => {
        const nameInput = component.form.controls.name;
        expect(nameInput.errors.required).toBeTruthy();
    
        nameInput.setValue('John Peter');
        expect(nameInput.errors).toBeNull();
    });

First, we get the name form control from the form form group property. We expect the initial errors object to contain a required property, as the input’s value is empty. Next, we update the value of the input, which means the input shouldn’t contain any errors, which means the errors property should be null.

If all tests are passing, it means we’ve successfully created a dynamic form. You can push more objects to the formConfig array and add a spec to test that a new input element is created in the view.

Conclusion

Tests are vital when programming because they help detect issues within your codebase that otherwise would have been missed. Writing proper tests reduces the overhead of manually testing functionality in the view or otherwise. In this article, we’ve seen how to create a dynamic form and then we created tests for the form to ensure it works as expected.


One More Thing: End-to-End UI Test Automation Coverage

On top of all unit, API, and other functional tests that you create, it is always a good idea to add stable end-to-end UI test automation to verify the most critical app scenarios from the user perspective. This will help you prevent critical bugs from slipping into production and will guarantee superb customer satisfaction.

Even if a control is fully tested and works well on its own, it is essential to verify if the end product - the combination of all controls and moving parts - is working as expected. This is where the UI functional automation comes in handy. A great option for tooling is Telerik Test Studio. This is a web test automation solution that enables QA professionals and developers to craft reliable, reusable, and maintainable tests.

Telerik JustMock Gains Improvements for Azure DevOps and More with R1 2020

$
0
0

I am excited to present to you the R1 2020 release of our mocking framework JustMock which includes improvements to the Azure Pipeline task, new integration with Visual Studio code coverage for .NET Core and implementation of ArrangeSet and AssertSet methods to the MockingContainer.

Without further ado let me introduce you the new features and most important fixes.

JustMock Azure Pipeline Task Supports .NET Core Tests

We know your pains and we are addressing them. The execution of JustMock unit tests targeting .NET Core in Azure pipeline had a different approach than those targeting the .NET Framework. With this release, we are unifying how the tests for both platforms are executed and now you can use only the JustMock task to execute your tests without other additional tasks, tooling or settings. The new version of the extension is already uploaded and the task will be automatically updated in your pipeline. If you would like to try it here is the link to the marketplace..

JustMock Azure Pipeline Task Supports .NET Core

JustMock Azure Pipeline Task Supports VS 2019 as a Test Platform version

Another pain you wrote us frequently about is the lack of support for Visual Studio 2019 test platform. With this release we are providing this option for you. In addition to that we have fixed an issue with failing tests when the “Installed by Tools Installer” option is selected for test platform version. With this we have implemented and fixed all known issues and requests related to the test platform version.

Implement VS 2019 as a Test platform option for the Azure Pipeline task

Integration with VS Code Coverage for .NET Core

Many of our clients are using Visual Studio Enterprise and they love the build in code coverage. Actually, this is the tool that JustMock is most frequently integrated with. However, there was a limitation. The integration could be used only for projects targeting .NET Framework. With this new release we are introducing support for projects targeting .NET Core as well.

JustMock is Now Integrated with VS Code Coverage for .NET Core-770

ArrangeSet and AssertSet Methods for MockingContainer

Until now it was difficult and additional efforts were required to arrange and assert the set operation of a property when you used our implementation of an IoC container named MockingContainer. This is why we implemented the ArrangeSet and AssertSet method for the MockingContainer. The API is now similar to the one for mocking normal property set operation.

[TestMethod]
public void ShouldAssertAllContainerArrangments()
{
    // Arrange
    var container = new MockingContainer<ClassUnderTest>();
  
    container.Arrange<ISecondDependency>(
       secondDep => secondDep.GetString()).MustBeCalled();
    container.ArrangeSet<IThirdDependency>(
        thirdDep => thirdDep.IntValue = Arg.AnyInt).MustBeCalled();
  
    // Act
    var actualString = container.Instance.StringMethod();
    container.Instance.SetIntMethod(10);
  
    // Assert
    container.AssertSet<IThirdDependency>(thirdDep => thirdDep.IntValue = 10);
    container.AssertAll();
}

Visual Studio Debugger Arrowhead Pointer is Messed when Profiler is Enabled with .NET Core

This issue was very unpleasant. While debugging the code you have mocked in a .NET Core project the debugger arrowhead pointer was at a different line of the code than the actual one. After thorough research of what is causing the issue, we found out that the underlining problem is a bug in the .NET Core CLR. Long story short, Microsoft provided a fix to this bug. If you would like to take advantage of this fix you could upgrade your application to .NET Core 3.1 version, which includes the fix.

Try It Out and Share Your Feedback

The R1 2020 release is already available for download in customers’ accounts. If you are new to Telerik JustMock, you can learn more about it via the product page. It comes with a 30-day free trial, giving you some time to explore the capabilities of JustMock.

Try Now

Be sure to sign up for the Telerik R1 2020 release webinar on Tuesday, January 21st at 11:00 AM ET  for a deeper look at all the goodness in the release, where our developer experts will go over everything in detail.

Reserve Your Webinar Seat

Feel free to drop us a comment below sharing your thoughts. Or visit our Feedback Portal and let us know if you have any suggestions or if you need any particular features.

You can also check our Release History page for a complete list of the included improvements.

What’s New in the Latest Test Studio Service Pack

$
0
0

Test Studio is one of the first tools to support the new Microsoft Edge Chromium-based browser.

To provide tooling for building efficient, fast tests with full browser coverage has always been one of our main goals. Out-of-the-box cross-browser support is something that our customers value a lot. This is why we added support for the official release of the new Edge Chromium. In the latest Test Studio service pack (R3 2019 SP2) you can record and playback tests on the new Edge, IE, Chrome and Firefox.

Edge support is not the only great addition to the product. Here is the list with other features and improvements:
  • The ability to preserve the state of opened tests on Test Studio restart – if you enable that option, when you restart Test Studio, all previously opened tests will be reopened.
  • Project settings import - when you have everything lined up and working in your existing Test Studio project, but you need to start a new one, you would like to transfer some of the settings for quicker project setup. Now you can select which settings to be imported to new projects.
  • Translator optimization:
    • In Project Settings translators now can be selected or deselected by group.
    • Translator loading is optimized for faster recording experience.
  • Export Load test results summary to HTML.
  • New ScrollToVisible to window center option is introduced for action steps.

On top of this there are a ton of UI improvements and bug fixes that will make your life as a tester better. You can check out the full list.

You can download the latest version right now from your account. Or if you're new to Test Studio, get started with a free trial today.

Start Your Trial

Happy Testing!

Test Studio to Focus on Web Testing

$
0
0

The change is intended to provide maximum value for your highest priority projects.

Based on customer feedback and product usage, we plan to focus our Test Studio engineering resources on web testing, including support for web-related load, responsive and web services testing. This shift will help ensure that we can provide maximum value to customers for their highest priority projects. That means we will be discontinuing the Test Studio mobile native/hybrid application testing (“Mobile Testing Feature”).

The massive shift towards agile practices requires substantial investments into CI/CD methods for frequent application delivery. The ability to execute quick and stable test automation is an inseparable part of this process. In order to enhance our customer’s test execution and flexibility, we’re adding one free Test Studio Run-Time license per each Test Studio Ultimate license seat, for all existing and new customers.

What Does This Mean Going Forward?

Discontinuance of Mobile Testing Feature

We are providing you with notice that the change related to the Mobile Testing Feature will be implemented starting with the R1 release of Test Studio on March 31, 2020 and as of this date support will be provided for the Mobile Testing Feature until March 31, 2021 in accordance with the applicable terms of the Progress End User License Agreement available at: https://www.telerik.com/purchase/license-agreement/teststudio.

After March 31st, 2021 the Mobile Testing Feature will no longer be part of the Test Studio Product.

However, if you are currently using the Mobile Testing Feature and choose not to update to a newer release you may continue to use the Test Studio Product previously licensed to you for the duration of your existing license.

R1 2020 Release

The Test Studio Mobile Testing Feature in R1 2020 can be initiated using the executable in the installation directory:

\<Your Path>\Progress\Test Studio\Bin\MobileStudio\Telerik.MobileTesting.exe

The documentation related to the Mobile Testing Feature will remain available online until March 31st, 2021.

Future Plans and Research for Responsive Testing

The Test Studio team is working on a new Responsive testing feature that will allow you to check the appearance and functionality of your web applications in any device resolution. We would like to provide the best and most complete Web test automation tool. This is why we chose to develop the Responsive testing feature along with the other major UI/UX product improvements and features.

Future plans described in this communication are intended for informational purposes only and should not be relied upon when making any purchasing decision. We may decide to add new features at any time depending on our capability to deliver products meeting our quality standards. The development, releases and timing of any features or functionality described for Telerik products remains at the sole discretion of Progress. Nothing in this communication represents a commitment, obligation or promise by Progress to deliver or otherwise make available any products or product features at any time in the future.

Run-Time Licenses for Test Studio Ultimate Customers

All new and existing Test Studio Ultimate licensees will receive one free Test Studio Run-Time license with each user license. (An existing Test Studio Ultimate licensee is a licensee who holds a perpetual Test Studio Ultimate license and/or a “term” or “subscription” based Test Studio Ultimate licensee who is currently in an active license period for which all relevant accrued license fees have been paid).

The free license for perpetual license holders will be an add-on to existing license and supported under and for the remainder of your existing maintenance and support subscription. Free license for term/subscription license holders will last for the remainder of your existing subscription/term license.

We’re Here to Help

We’re ready and able to assist you at any time. Please reach out to your account manager or contact me directly at Iliyan.panchev@progress.com. Thank you for your continuing support.


New Reports and Web Components Support in Test Studio R1 2020

$
0
0

Test Studio R1 2020 is out! With it Shadow DOM is no longer a problem at all. Sharing beautiful reports of your application and test automation quality has never been easier.

Let me picture for you a situation that you may already have been stuck into. While you automate your web tests, you clearly see some elements on the screen but you cannot find in the DOM tree of your application and you have no idea how to access them through your test scripts. You can use a recorder to record some steps against these elements but during execution, the test fails to locate them or performs the desired action on another element.

Sound familiar? Well, most probably the app under test uses “Web Components,” a technology that is gaining a lot of traction recently but is making the quality assurance engineer's life a lot harder.

Web Components Support

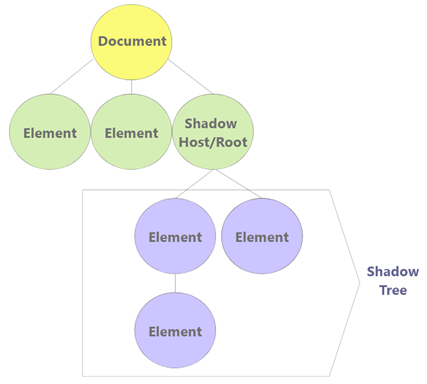
ShadowDOM

“Web Components” is a modern browser feature based on three main technologies:

  • Shadow DOM - allows the creation of a whole new encapsulated DOM attached to an element
  • HTML templates - allows the reuse of markup templates by <template> and <slot> tags which are not displayed and rendered by the browser
  • Custom elements - allows the creation of custom elements and is tightly integrated with the previous two technologies

Web Components are very powerful but extremely hard to automate. Test automation with a Shadow DOM is a challenge because the elements inside a Shadow DOM subtree don’t exist in the main DOM tree.

Fortunately, Test Studio provides out-of-the-box support, which ensures seamless and stable test automation with or without Web Components (Shadow DOM, templates or Custom elements) in your application. Test Studio identifies all Shadow DOM trees in the loaded page and records/executes any action, verification, real click or type against that element as if it is a regular element part of the main DOM tree.

Undoubtedly “Web Components” support is amazing news for all testers who automate, but we also have a pleasant surprise for managers. They usually need to use a lot of reports, and they want them beautiful, easy to create and green. Well, while the last part is up to the development team, Test Studio takes care of the first two.

Reports in the Executive Dashboard

Test Studio Reports

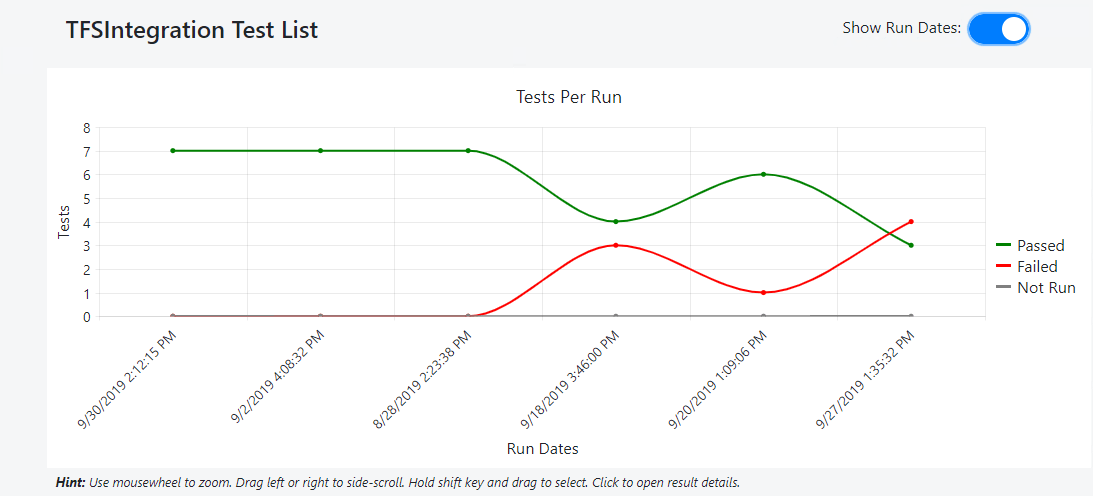
Test Studio Executive Dashboard is a web page that allows you to monitor test results reported from all testing agents. With this release, beautiful reports can be also generated inside the Executive Dashboard. Select a time period and one or multiple test lists, and the Executive Dashboard does the rest. All reports can be easily shared by just sending the link. Anyone can access it in their browser, no matter if they have active Test Studio license or not.

Along with these great new additions to Test Studio’s feature set, we also shipped a lot of improvements and bug fixes. You can take a look at the full changelog here.

You can download the latest Test Studio version from your account right now. Or if you're new to Test Studio, get started with a free 30-day full-featured trial today.

Start Your Trial

Happy testing!

Meet Our Mascots: The New Telerik Ninja and Kendo UI Kendoka!

$
0
0

We’re excited to announce the new Telerik and Kendo UI mascots! Your familiar Ninja and Kendoka have evolved but remain your faithful companions. You’ll also notice updated branding across our website and beyond, plus a refreshed UX to help you get around with ease. 

For nearly two decades, several generations of Telerik Ninjas have served faithfully as mascots for our productivity tools for .NET developers. Ten years ago, the first Kendo UI Kendoka appeared. The martial arts training was no coincidence as it promotes three of our main values as a company: doing things a little better every day, contributing to our community and adapting quickly to a dynamic environment. Indeed, Telerik and Kendo UI enable .NET and JavaScript developers to cut down development time and increase productivity while delivering engaging web, desktop and mobile experiences every day.

The Telerik Ninja and Kendo UI Kendoka

The Telerik Ninja and Kendo UI Kendoka

Our mission is to provide the needed components and tools for all .NET technologies and the major JavaScript frameworks and enable developers to implement the latest design and UX trends, so your apps can always be sleek and user-friendly. At the same time, we are always looking ahead to the technologies on the horizon, so we can deliver the needed innovation even before our customers need it – be it in design and UX, new technology frameworks or new application development paradigms such as AR/VR.  

We feel that our mascots should express that and speak for the same values – capable, modern, innovative, trustworthy. Meet the new generation of the Ninja and the Kendoka. The new graphic design evolves the fundamentals of our brand while remaining faithful to our true nature.  

Telerik Ninja

Kendo UI Kendoka

With their newly-gained flexibility, they can now tell the Progress Telerik and Kendo UI story in fresh and colorful new ways. Our heroes come with a new, vibrant color palette that will help you easily distinguish our brands and, we hope, make it an even more pleasant experience to come back to our websites.

New Telerik Colors & Icons

We also felt our website should be more welcoming while offering the same outstanding level of experience that our products do. To achieve that, we’ll be updating the website experience in the coming days and weeks, and we’re excited to offer you a quick sneak-peek into it with our new homepage: www.telerik.com  

New Telerik Website

The new experience will get you to the right solution faster, make it easier to explore products and offer quick access to all your assets—product documentation, demos, learning experiences, support and your account. 

If you love the new visuals as much as we do, check out this wallpaper we’ve prepared for you.   Download the wallpaper

New Telerik Wallpaper

Join the Raffle

If you like the new Ninja and Kendoka, please help us spread the news by sharing on your Twitter, Facebook or LinkedIn profile and tagging us with @Telerik/@KendoUI. You can use the widget below to spread the news & enter our raffle for a chance to win one of the following prizes:

Telerik Raffle Prizes

Time to Enter the Raffle!

Use the widget below to complete both Step 1 & Step 2 for a chance to win one of the awesome prizes! 

a Rafflecopter giveaway Good luck!

Telerik and Kendo UI R2 2020 Release is Here!

$
0
0

The second major release of 2020 for Telerik and Kendo UI developer tools is here, and it’s packed with a ton of gems: new and exciting components, features and improvements to fully equip every developer for every .NET and JavaScript project! Read on for more details.

Our amazing developer teams at Progress have been hard at work, doing what they can in the best way possible. Our goal is to enable you as developers to be well-equipped with sleek, unified and customizable UI that is compatible with the latest and greatest technologies so that you can build modern, feature-rich and professionally designed web, desktop and mobile applications in less time and with less effort. With the backing of our legendary support team, which consists of the same developers who build the products, and a ton of resources and trainings you can rest assured that you have a stable partner to rely on for your software development journey.

I am super excited to announce that today, the R2 2020 release of Telerik and Kendo UI is LIVE! In addition, I am pleased to share the newly released Telerik and Kendo UI mascots. Your familiar Ninja and Kendoka have evolved but remain your faithful companions. You’ll also notice updated branding on our homepage (www.telerik.com), plus a refreshed UX to help you get around with ease. 

Now let’s dive deeper into what R2 2020 brings, so, grab a cup of coffee, as there is plenty to explore.

Note: Links to individual product blog posts will go live as the posts do today.

Updates in the Telerik R2 2020 Release

The New Era of .NET is Coming! Telerik Controls Now Feature Support for .NET 5 Preview, Blazor WebAssembly, and 40+ Blazor Native Components!

Learn more about newly released gems in the .NET product line below.

Telerik Release R2 2020_1170x285

Web Development

Telerik UI for Blazor with 40+ Native Components

  • Telerik UI for Blazor is compatible with the latest release of Blazor WebAssembly
  • New components: Upload, ListView, MultiSelect, DateRangePicker, Drawer, Pager, Tooltip and CheckBox
  • New Grid features: Persist State, Support for Nested Models, Export to Excel, Column Visualization, Grid Frozen Columns, Grid Aggregates, Grid Autogenerated Columns, Grid Storable and Individual Column, Grouping from Code and Column and Group Header Template
  • New Scheduler improvements: Recurring Appointments, Month View
  • Visual Studio Code Template Wizard: Provides predefined templates for creating Telerik UI for Blazor in Visual Studio Code
  • Visual Studio Convert Project Wizard: Convert Blazor projects with ease to Telerik UI for Blazor
  • Read More: Release blog post | product page

Telerik UI for ASP.NET Core & Telerik UI for ASP.NET MVC

  • Telerik UI for ASP.NET Core ships with support for latest preview of .NET 5
  • New Components: Form, Stepper and TileLayout
  • Grid Grouping improvement: DataSource Server-Side Remote Grouping
  • Scheduler component enhancements: Virtualization, Set different workday and more
  • Floating Label for Inputs
  • New Rendering for DateTimePicker and TimePicker
  • Read More: Release ASP.NET Core blog post | product page
  • Read More: Release ASP.NET MVC blog post I product page

Telerik UI for ASP.NET AJAX  

  • New components: PDF Viewer and Timeline
  • Spreadsheet improvements
  • Read More: Release blog post | product page

Desktop Development

Telerik UI for WPF

  • Telerik UI for WPF ships with support for.NET 5 Preview
  • .NET Core Converter which will enable converting WPF projects to .NET Core
  • New components: Callout and Notify Icon control
  • Sub-menu support for Navigation View
  • Keyboard search for TreeView and PropertyGrid
  • Custom time indicator support in ScheduleView
  • Read More: Release blog post | product page

Telerik UI for WinForms

  • Telerik UI for WinForms ships with support for.NET 5 Preview
  • .NET Core Converter which will enable converting WinForms projects to .NET Core
  • Support for Vector images in all controls
  • New components: Validation provider
  • Multi-shape annotations for ChartView
  • BrowseEditor integration in FileDialogs
  • Read More: Release blog post | product page

Mobile Development

Telerik UI for Xamarin

  • New Components: DatePicker, TimePicker and TimeSpanPicker
  • Sticky group headers for ListView
  • Improvements in Calendar – API to open end edit the edit appointment UI and built in add appointment button
  • Read More: Release blog post | product page

Reporting and Report Management Solutions

Telerik Reporting and Report Server

  • Improved web-based report designer
  • New barcode symbologies
  • Base64-encoded Images Support in PictureBox Item
  • Ability to freeze Table/Band Header in Web-based report viewers
  • Blazor Report Viewer V.2.0 in Telerik Reporting
  • Telerik Reporting runtime supports .NET 5 Preview
  • *Telerik Reporting features report viewers for Blazor, ASP.NET Core, ASP.NET MVC, ASP.NET Web Forms, WPF, WinForms, HTML5, Angular, React, and Vue apps.
  • Read More: Release blog post | product page (Reporting / Report Server)

Automated Testing and Mocking Tools

Telerik JustMock

  • Implement a Visual Studio window for visualizing the mocked objects during debug
  • Improve the loading time of JustMock Visual Studio extension
  • Read More: Release blog post | product page

Telerik Test Studio Dev Edition  

  • Web components support which ensures seamless and stable test automation
  • Read More: Product page

Looking Forward to WinUI 3.0

Microsoft is working on a new version of WinUI 3.0, which will deliver a lot more possibilities for desktop developers. Are you interested in seeing what we are cooking with WinUI 3.0? Subscribe here and you will receive the first bits later this month.

Updates in the Kendo UI R2 2020 Release

Kendo UI has Your Back with New Native UI Components and Features for Angular, React, jQuery and Vue!

Learn more about newly released gems in JavaScript product line below (or check out this blog post).

Kendo UI Release R2 2020_1170x285

Kendo UI for Angular

  • New components: Stepper Component, External Drop Zone Component, Pager Component and Label Component
  • Design Guidelines for Building Forms in Angular
  • TreeList: v1 Officially released
  • TreeList: Virtualization, Selection, Keyboard Navigation, Accessibility
  • TreeView: Load More Button
  • Grid improvements: Persistence for Expand and Collapse state of detail rows
  • Conversational UI: Support for the DialogFlow v2 API
  • Read More: Release blog post | product page

KendoReact

  • New components: ListView, Progress Bar, Chunk Progress Bar, Stepper, Label, Floating Label, Hint and Error, Radio Button, Radio Group, Range Slider, FormElement and FieldWrapper
  • Design Guidelines for Building Forms in React
  • TreeList Improvements: Virtualization, Built-In Pager, Column Menu, Drag & Drop, Aggregates
  • Grid Improvements: Checkbox Filter
  • Scheduler Improvements: Header & Footer Custom Rendering
  • Form Improvements: Form-Level Validation, FieldArray
  • Drawer Improvements: Custom Rendering
  • Read More: Release blog post | product page

Kendo UI for jQuery

  • New components: Form, Stepper, TileLayout
  • Scheduler: Virtualization, Google Calendar integration, Search & Filter options
  • DataSource: Server-side Remote Grouping support
  • Validator: New Validation Summary, Inline validation rendering support
  • Inputs: Floating Label support
  • DateTimePicker & TimePicker: New Rendering Options
  • Read More: Release blog post | product page

Kendo UI for Vue

  • New components: Native Calendar, Native DateInput, and Native DatePicker
  • Native Grid Improvements: Footer Cell and Extensive bug resolution effort
  • Preparation for Vue 3.0
  • Read More: Release blog post | product page

Sign Up for the Release Webinars

Telerik Kendo Release-2

Seeing is believing, so register to see all the new features – the webinars are coming up fast! It will help you to follow along easily if you download the latest release here.

To see what’s new in Telerik products, sign up to join either or both of our webinars on Thursday, May 21:

What’s New in Web Development Solutions – 11.00 AM ET

  • Telerik UI for Blazor
  • Telerik UI for ASP.NET Core
  • Telerik UI for ASP.NET MVC
  • Telerik UI for ASP.NET AJAX 

Register Here

What’s New in Desktop, Mobile, Reporting and Mocking solutions – 12.00 AM ET

  • Telerik UI for WPF
  • Telerik UI for WinForms
  • Telerik UI for Xamarin
  • Telerik Reporting and Report Server
  • Telerik JustMock

Register Here

To see what’s new in Kendo UI, sign up to join any or all 4 webinars on Tuesday, May 19:

  • What’s New in Kendo UI for Angular - 11:00 AM ET
  • What’s New in KendoReact - 11:30 AM ET
  • What’s New in Kendo UI for jQuery - 12:00 PM ET
  • What’s New in Kendo UI for Vue - 12:30 PM ET

Register Here

Thank You

We recently asked our customers to describe their experience with our tools and support. Thank you for the amazing responses! We were blown away and thought it would be fun to organize your responses in the language that binds us all together – code :). Here it is, using our customers’ own words. As always, you make what we do possible.

DevCraft Customer Words

Thank YOU for your trust in us!

About DevCraft 

Telerik DevCraft is the finest software developer tools collection across .NET and JavaScript technologies, which includes modern, feature-rich and professionally designed UI components for web, desktop and mobile applications, reporting and report management solutions, document processing libraries, automated testing and mocking tools from the Telerik and Kendo UI suites. DevCraft will arm you with everything you need to deliver outstanding applications in less time and with less effort. With the backing of our legendary support team, which consists of the developers who build the products, and a ton of resources you can rest assured that you have a stable partner to rely on for your everyday challenges in your software development journey.

What’s New in Test Studio 2020 R2—Responsive Testing, OCR & More

$
0
0

The new Responsive Testing in Telerik Test Studio allows you to validate your application’s responsive web design behavior against different form factors and browser window sizes. Combined with the amazing OCR features, it makes Test Studio the most complete and reliable web test automation tool on the market.

Responsive Testing

Responsive web design ensures that websites can be viewed from and can be fully functional on any device regardless of screen or browser size, whether it is a desktop computer, mobile phone or tablet.

Did you know that nearly 60% of all web traffic comes from mobile devices?

What about the fact that Google prioritizes mobile page load speed as a key metric when determining a website's search ranking? A slow or unresponsive mobile website results in bad SEO and significant penalties to your overall ranking across devices.

Responsive Testing

Responsive web design is crucial to the success of your applications today. Investing in test automation is an important step towards improving your overall testing quality and efficiency. Considering adding more scenarios as part of your automation process is just as important. Such a scenario might be to verify how the app under test behaves under different form factors. With the new Responsive Testing feature in Test Studio Ultimate you can easily do that using the same techniques that you are used to from creating automated web tests with Test Studio.

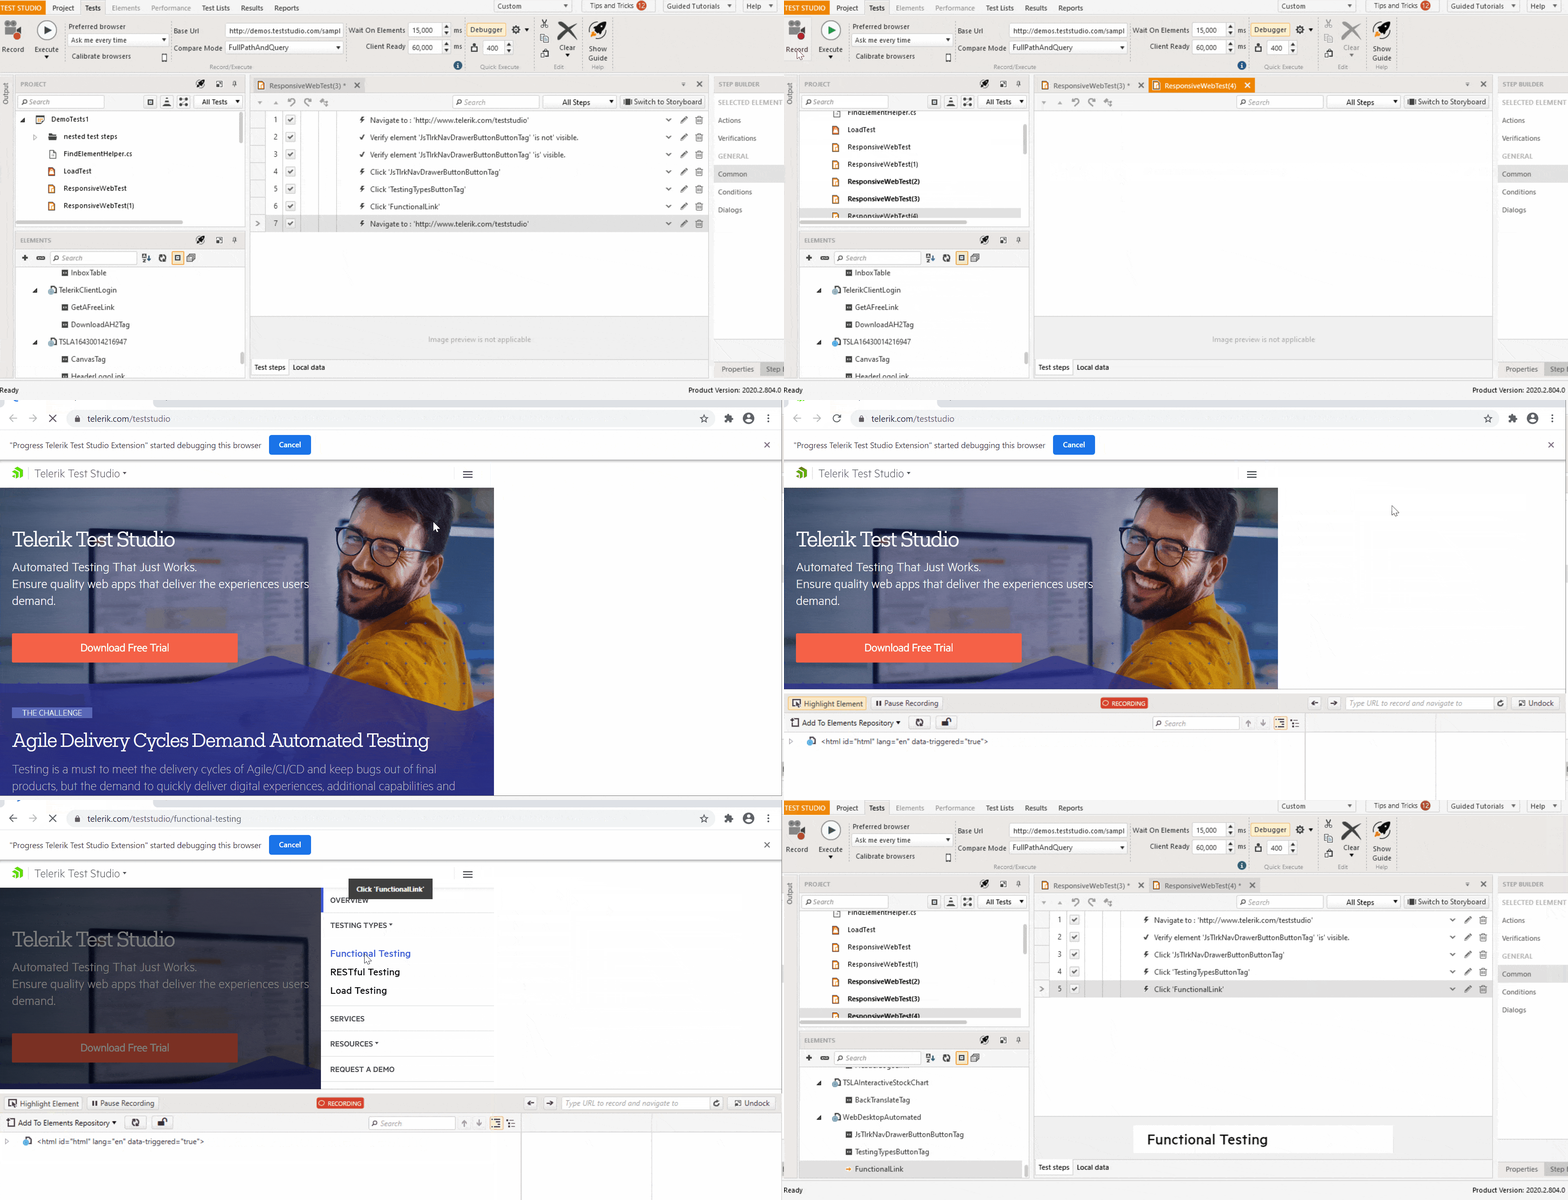
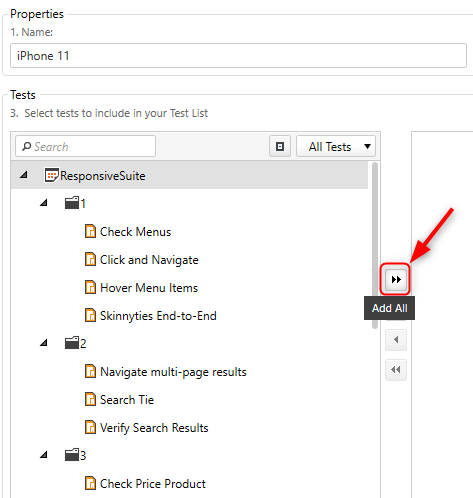
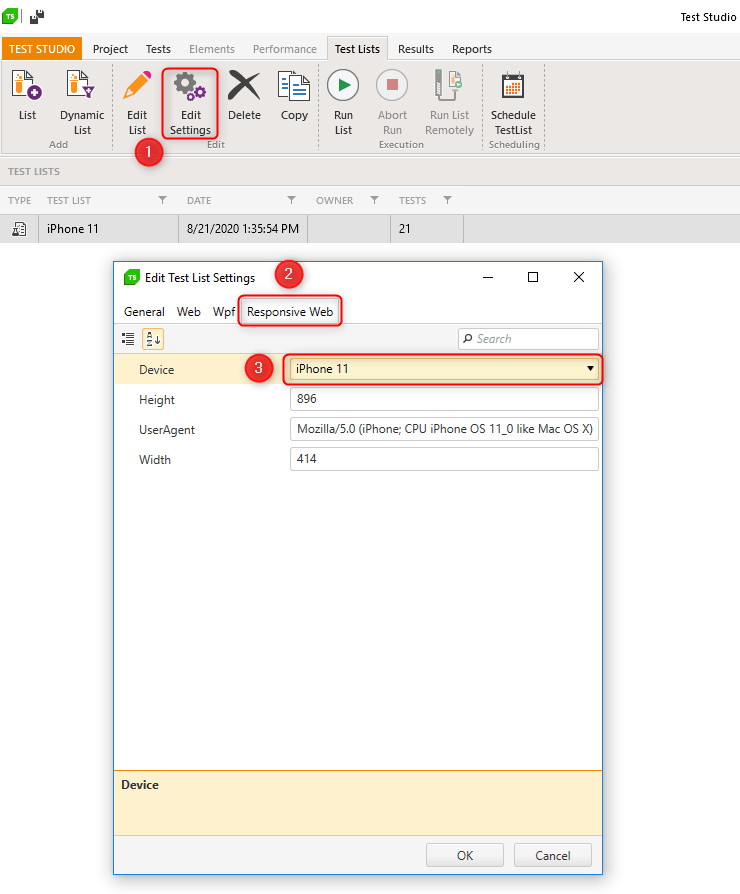
This release brings a brand new Responsive Testing feature to help you test your web application's behavior on mobile and desktop browsers, easily, without learning curve or coding. Choose what form factor your website will operate in and run the Recorder with Chrome or the Chromium-based Edge. Record tests to verify the responsive version of the application under test is behaving as expected. Once the tests are created, put them into a test list and run them choosing from the predefined devices or add custom screen sizes.  

The new Responsive Testing approach has several strong advantages. It makes the tedious and repetitive testing redundant. Let’s face it—switching devices and validating one and the same thing all over again is not the most fun thing to do. Moreover, you don’t need various devices at hand in order to cover different scenarios and form factors. You just let Test Studio do the heavy lifting saving you time and effort.

Automated Testing of Responsive Web Design

If you want to play with this great new feature you can download the latest Test Studio build from your account or start a trial if you are not a customer yet.

Start Your Trial

OCR (Optical Character Recognition) Features

OCR Verification and Extraction

Web functional UI QA engineers often struggle with different types of hard-to-automate elements. The Scalable Vector Graphics (SVG) elements, which are widely used for vector-type diagrams like bars, pie charts, scalable icons and logos are a great example of elements causing automation issues. The SVG is basically an image, which contains static or dynamic data that needs to be validated.

It is challenging to automate scenarios, where such elements are encompassed, with the conventional DOM-based element find logic, regardless of the tool or framework. The interaction with the DOM is a time-consuming process, which requires advanced automation skills and often leads to broken test scripts.

ConfusedNinja

With the new OCR features Test Studio offers the solution, ensuring that you will be able to cover tricky and cumbersome scenarios during web test automation. In order to ease automating the validation of such elements, Test Studio now provides three additional steps, which you can apply during test automation:

  • Verify Image

    During recording, capture any element as an image—use the entire image or select part of it and use it for comparison during execution.

    Automate verification of logos, static images, charts or any other element by visual comparison. The validation applies to the entire selected area. If you need to get further and validate only a single line of text which is inaccessible from the DOM-three, use the new Verification step with OCR.       

  • OCR Verification

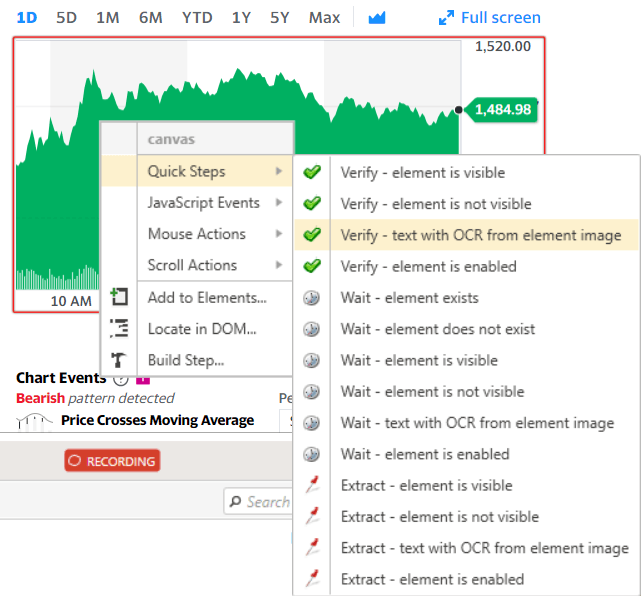
    Imagine a chart containing dynamic and static data. Due to the nature of this, let’s say <canvas> element, nothing inside can be accessed separately. The full image comparison won’t work properly because the content will change each time the page is loaded. The first step is to validate the static text in the <canvas>—the title, any X, Y-axis labels, etc. Use Test Studio’s Recorder to extract the text from the image and validate it with the new OCR Verification step.

  • OCR Extraction

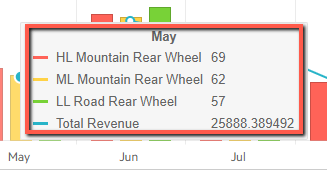
    Let’s take the chart from the previous example. The static text is already verified but how to compare the dynamically changing data with the actual values from the data source? This will ensure that the chart is loading the correct data and is behaving as expected. Here the new OCR Extraction step comes to hand. Apply that step during recording in order to extract text from an image and assign it to a variable. This feature can be used in various scenarios:

    • Validate data against data source. Make sure the correct set of data is being loaded.
    • Use the captured string into input fields. It is always useful to create real-world scenarios. For example, the website under test provides a personal savings calculator and users would like to use the latest stock price from the chart above. It is easy to recreate this one—use the new Extraction text step to get latest stock price from the chart, then apply the value into any field.

ninjas-10q-v3

Auto-Refresh Pause of the Recorder DOM Viewer

Many modern websites have constantly reloading elements which trigger changes of the DOM tree and thus multiple refreshes inside Test Studio’s Recorder. This prevents the QA Engineer from adding actions and verifications freely and confidently.

Test Studio now allows you to pause the DOM tree auto-refresh inside the Recorder, ensuring the desired state of the DOM is loaded. Thus, all required actions or verifications can be easily added with no hassle. Moreover, the Recorder is now equipped with a manual DOM tree refresh button allowing you to refresh on demand, based on your recording scenario.

DOM Viewer Freeze in Test Recorder

Remote Execution Machines Dialog Handler Updates

New browser versions often break the dialog handling, causing certain recorded steps to not work. Therefore, Test Studio provides a hot-fix-based system for updating the dialog handlers which deploys the fix on the go, without the need to reinstall the tool. Thanks to some important product enhancements in R2 2020, the hot-fix-based system has been extended to remote execution machines. Test Studio now allows you to update all your remote machines with the latest dialog handlers without leaving the tool, saving you time and effort.

Along with these great new additions to Test Studio’s feature set, we also shipped a lot of improvements and bug fixes. You can take a look at the full changelog here.

If you want to see the new features in action, don't miss our live release webinar on August 26, 11 am ET. Make sure to save your seat

You can download the latest Test Studio version from your account right now. Or if you're new to Test Studio, get started with a free 30-day full-featured trial today.

Start Your Trial

Happy testing!

Just Announced: Telerik and Kendo UI Release Week Live Webinars

$
0
0

The Telerik and Kendo UI webinars for R3 2020 are coming up! Catch a whole week of webinars from September 28th through October 2nd.

It’s release time of the year again!

The third release of 2020 for Telerik and Kendo UI is coming as planned on September 16, bringing major updates across .NET and JavaScript product lines.

Join our developer experts and products teams for the R3 2020 release week, packed with live webinars, Twitch demo sessions and exciting news.

Find out what’s new in your library of choice! 

Follow three quick steps and sign up for the webinar of your choice:

  1. Select the webinar from the list below
  2. Click the button “Save Your Seat”
  3. Register for the webinar

Each webinar will be complemented with a Twitch session right after, where you will be able to see more examples of using the new components and features, and questions live in the chat.

You can register for more than one webinar.

Telerik Web 2 R3 2020 Webinar

Telerik Web Products R3 2020 Release Webinar

Live Webinar: September 28 @11:00 am – 12:00 pm ET

Blazor Twitch Session: September 28 @ 12:30 pm – 14:30 pm ET

Save Your Seat

Here are some of the highlights we will cover in the Telerik Web Products release webinar, plus a ton of product updates across Telerik UI for Blazor, Telerik UI for ASP.NET Core, Telerik UI for ASP.NET MVC, and Telerik UI for ASP.NET AJAX:

  • Telerik UI for Blazor now shines with 50+ truly native components and the most anticipated Grid features. In addition, Telerik enables Blazor integration across its toolset—Reporting, JustMock, Test Studio and Xamarin. 
  • Telerik UI for ASP.NET Core ships with support for the latest preview of .NET 5, along with many new components and improvements across the entire Core library.

Kendo UI for React Vue R3 2020 Webinar

KendoReact and Kendo UI for Vue R3 2020 Release Webinar

Live Webinar: September 29 @11:00 am – 12:00 pm ET

Twitch Session: September 29 @12:30 pm – 14:30 pm ET

Save Your Seat

Here are some of the highlights we will cover in the KendoReact and Kendo UI for Vue release webinar, plus a ton of product updates across KendoReact and Kendo UI for Vue:

  • KendoReact adds eight new components to its rich library. This includes the highly requested Gantt chart, which provides you with everything you need to add a UI component for performant, clean and good-looking project timelines. 
  • Kendo UI for Vue releases official Vue 3.0 support, along with new native UI components for Vue.

Kendo UI for Angular jQuery R3 2020 Webinar

Kendo UI for Angular and jQuery R3 2020 Release Webinar 

Live Webinar: September 30 @11:00 am – 12:00 pm ET

Twitch Session: September 30 @12:30 pm – 14:30 pm ET

Save Your Seat

Here are some of the highlights we will cover in the Kendo UI for Angular and jQuery release webinar, plus a ton of product updates across Telerik UI for Angular and Telerik UI for jQuery:

  • Kendo UI for Angular releases official Angular 10 support across the entire suite, along with new AppBar, ListView and Range Slider components.
  • Kendo UI for jQuery enriches its library with new Image Editor, Wizard and Loader components, along with many improvements across the entire jQuery library.

Telerik Desktop and Mobile R3 2020 Webinar

Telerik Desktop and Mobile Products R3 2020 Release Webinar

Live Webinar: October 1 @11:00 pm – 12:00 pm ET

Twitch Session: October 1 @12:30 pm – 14:30 pm ET

Save Your Seat

Here are some of the highlights we will cover in the Telerik Web Products release webinar, plus a ton of product updates across Telerik UI for WPF, Telerik UI for WinForms, Telerik UI for WinUI and Telerik UI for Xamarin.

  • Telerik UI for Xamarin ships Blazor Bindings support for AutoCompleteView and DataGrid controls.
  • Telerik UI for WPF and WinForms release support for the latest preview of .NET 5, along with the most requested components and many improvements across both libraries.

Telerik Reporting Testing R3 2020 Webinar

Telerik Reporting and Testing R3 2020 Release Webinar

Live Webinar: October 2 @11:00 am – 12:00 pm ET

Twitch Session: October 2 @12:30 pm – 14:30 pm ET

Save Your Seat

Here are some of the highlights we will cover in the Telerik Reporting and Testing release webianr, plus a ton of product updates across Telerik Reporting, Telerik Report Server, Telerik Test Studio Dev Edition and Telerik JustMock:

  • Telerik Reporting introduces dedicated wizards for new WebService, JSON and CSV data sources to the Web Report Designer.
  • Telerik Test Studio Dev Edition ships exclusive Blazor support through unique ready-to-use translators, enabling easy test automation of the most popular Telerik UI for Blazor components.
  • In addition, Telerik Reporting and Telerik Test Studio Dev Edition enable integration with the full Telerik and Kendo UI suites, including Blazor. 

We’re All Ears!

The live webinars and Twitch sessions are a great opportunity for you to ask questions before and during the webinars. We’ll be waiting to hear from you on Twitter—please use the #heyTelerik and #heyKendoUI hashtag to join the conversationand on CodeItLive, our Twitch channel, via the live chat.

Sign up today to make sure you don’t miss these great events with our experienced developer advocates Ed Charbeneau, Microsoft MVP, speaker, author of Blazor: A Beginner’s Guide and host of Blazing into Summer week of Blazor events, Sam Basu, Microsoft MVP, speaker, DevReach co-organizer and author of numerous articles on Xamarin.forms, Alyssa Nicoll, Google Developer Expert, TJ VanToll, host of React Wednesdays, and Carl Bergenhem, speaker and host of a ton of JavaScript events.

Check Out All Our Webinars

Optical Adventures in Test Automation—to OCR or Not to OCR

$
0
0

It is challenging to automate scenarios where the data inside complex visual elements needs to be verified. With its new OCR features, Test Studio enables the user to extract, validate and reuse content from images, logos, charts and other elements—ensuring tricky and cumbersome scenarios are covered during web UI test automation. 

Do You See What I See?

Being able to make the computer see what you see with your own eyes, and then make the machine apply what it has “seen” to your needs, is an exciting experience. Imagine a scenario, where it feels just natural to look at an element on your website and use its contents in a search field, so that you can extract a filter from it and apply it to a list of items, literally, in a blink of an eye. With OCR you can run this extraction-verification cycle for any visual element on your site, be it a logo, graph, chart, etc., no matter how unconventional it is visually, and disregarding the complexity of the element’s find logic.

Yes, We Can!

We on the Test Studio team have just come up with a simple solution to the task at hand. With the latest release, R2 2020, there’s a set of features that will come in handy in scenarios like the above. You can now verify an entire image or parts of an image through pure visual comparison. You can extract text from a complex image containing both dynamic and static data. Even more, you can extract text from an image, assign it to a variable including validating data against the data source and use the captured string to populate input fields. Let’s put all that into action with a simple demonstration of the power of the brand-new Optical Character Recognition (OCR) features in Test Studio.

Show Me What You’ve Got!

Let’s say we have a conventional mail inbox and all of the navigation buttons are images. 

OCR Automated Testing

How would you verify that the image of the “Inbox” button is not swapped with the “Sent” one? The first thing that comes to mind is to compare the src attribute of the element with the actual one. Would that be enough? Or are there any cases in which we’ll receive a false positive error? Yes, there are. Some common scenarios are:

  • The image is not loading
  • The image at the src location is incorrect

To avoid such scenarios, you can use our new “Image Verification” step, which takes a snapshot of the element during recording and during test execution compares that snapshot with the actual image.

To record such a step, highlight the element which you would like to verify and select “Build Step…” from the drop down. Then from the Recorder window go to the “Verifications” tab, select “Image” and click “Add Step.”

OCR Automated Testing

OCR Test Automation

This is awesome, right? Now you are sure that the image is loaded successfully and is the one you have recorded.

But what will happen if the image of the element we are verifying contains some dynamic content like user input, dates, etc.? The test will fail intermittently with no actual bug at hand. The good news is that we’ve got you covered. You can select a part of the element and verify that the specific part is present in the element during execution. To accomplish this, you just need to uncheck “Verify Entire Image” and adjust the selection according to your preferences.

Verify Image Test Automation

Don’t stop there, go a bit further with our optical adventures. In our mail inbox we have a list of email messages with the sender as a header.

OCR Test Automation

It would be nice to be able to just look at a single sender, extract his name as we see it, apply that name to a search field and see the results for that sender only. And then, do that again for another sender, using the steps we already described above. Let’s see how that works with the new OCR features in Test Studio.

First, we pick the element of the sender of choice, and from the contextual menu of the element we choose the option to Extract—text with OCR from image:

OCR Extract Text

This action has automatically created a DataBindVaribale for us, containing the OCR-ed text from the element, so that we can use it in other steps later. For example, add a step that inputs the text from that variable to the search field of the mailbox.

OCR Extract Text Data Binding

And then, you can use the OCR verification step to make sure you’ve shown only senders that match your filter, again, from the quick context menu:

OCR Verify Text

And you’re done!

Still, there’s an alternative way to get to the OCR features, where you can play around a bit more with the extraction capabilities of Test Studio’s recorder. If you locate the element in the DOM-tree, you’ll find a new action in the step builder—TextFromImage. There, you can select a part of the image to extract text from, in correspondence with your specific scenario.

OCR Image Test Automation

To OCR or Not to OCR?

You’re just a few clicks away from automating a relatively complex scenario, using Test Studio’s new OCR features for advanced test automation. We’ve added these steps to the sample project, which you can explore from Test Studio’s Get Started section on the Welcome Screen, or play around with your own test cases. Just give it a go and let us know what you think.

Want to try out the exciting new OCR features? Start a free 30-day trial today with full support by our dedicated support team to help you complete a successful evaluation.

Try Test Studio

Telerik and Kendo UI R3 2020 Release is Here!

$
0
0

Always in step with the rapidly evolving .NET and JavaScript ecosystems, our Telerik and Kendo UI R3 2020 release is here to help developers keep up with the latest innovations in creating stunning web, desktop and mobile apps. Read on for more details!

Building modern, professional looking UI for business applications is hard work. Our developer teams at Progress have been hard at work during the summer to enable you as developers to be always in step with the rapidly evolving .NET and JavaScript technologies so that you can build beautiful, feature-rich and professionally designed web, mobile and desktop applications in less time and with less effort.

With R3 2020, we’ve released 45+ new components across Telerik and Kendo UI product lines, plus great improvements in Blazor and WinUI, support for .NET 5, Angular 10, Vue 3.0 and many new features and updates!

I am super excited to announce that today, the R3 2020 release of Telerik and Kendo UI is LIVE!

In addition, I am pleased to share that we’ve prepared for you Telerik and Kendo UI Release Week Live Session from September 28th to October 1st where our developer advocates will discuss the latest updates from their unique insider perspective into each framework and show them in practice.

Want to join in? Go ahead and save your seat at a release week webinar (or two) now, and then head back up here to read about all the amazing updates in this release.

I'll Go Save My Seat Now

Now let’s dive deeper into what R3 2020 brings, so, grab a cup of coffee, as there is plenty to explore.

Note: Links to individual product blog posts will go live as the posts do over the next few days.

Updates in the Telerik R3 2020 Release

Telerik Kendo UI Release R3 2020

Learn more about newly released gems in our .NET product line below

Telerik Web Products 

Telerik UI for Blazor with 50+ Truly Native Components

  • New components: Editor, Tile Layout, Tree List, Three Charts for the Financial Industry: Stock, Candlestick and OHLC, Loader, Context Menu, Switch, Button Group, Toggle Button 
  • New Grid features: Column Menu, Custom Filtering, Visible Parameter for Columns, Footer Template for Aggregates, Exposed multiple new events for Expand/Collapse, ContextMenu, Row click and double click events, Expanded Grid binding options with support for DataTable and dynamic ExpandoObject, Filter Enum Values support, support for grouping in OnRead  
  • New Chart features: Tooltip, Click event on the Chart element 
  • New TreeView features: Node click event and Node selection 
  • New Textbox features: Additional parameters (AutoComplete, Placeholder, Name, Title, TabIndex) and Password 
  • New Menu features: Menu separator and Disabled Items 
  • New Visual Studio Extensions & Installers features: Converting Blazor projects to Telerik UI for Blazor projects, Installers for Mac & Linux
  • New technical online training for both Blazor as a framework and Telerik UI for Blazor components
  • New and improved documentation and demos for faster load timesand better experience
  • Read More: Release blog post | product page

Telerik UI for ASP.NET MVC & Telerik UI for ASP.NET Core

  • Telerik UI for ASP.NET Core ships with support for the latest preview of .NET 5
  • New components: Wizard, Image Editor, Loader, App Bar, Pager, Text Area
  • New Gantt features: Column templates, Planned vs Actual Comparison, Column options
  • New Grid features: Sticky columns, Foreign Key Binding
  • New TreeList features: Drag, Drop & Reorder, Item Selection
  • New Scheduler features: Recurrence Editor Section 508 and WCAG 2.0 compliant
  • New Spreadsheet features: Render cells using custom HTML
  • New Numeric TextBox feature: Selecting all text on focus
  • Visual Studio Extensions & Installers: Convert ASP.NET Core projects to Telerik UI for ASP.NET Core projects, VS Dashboard project template
  • New and improved documentation and demos for faster load times and better experience
  • Read More: ASP.NET Core Release blog post | product page
  • Read More: ASP.NET MVC Release blog post I product page

Telerik UI for ASP.NET AJAX

  • New components: Card
  • New Chart enhancements: Crosshairs, DashType property for Area, Line and ScatterLine, Appearance settings for the series border, Option to reverse legend items order & turn on/off the highlight effect when series are hovered
  • New and improved documentation and demos for faster load times and better experience
  • Read More: Release blog post | product page

Telerik Desktop and Mobile Products

Telerik UI for Xamarin

  • New components: Combobox, RichTextBox
  • Blazor Bindings support for AutoCompleteView and DataGrid controls
  • New Calendar features: Add and edit appointments in the calendar UI
  • New PdfViewer feature: Search PDF documents for an improved mobile user experience
  • Fully functional Xamarin sample applications: CRM, ERP, ToDo and TagIt 
  • Read More: Release blog post | product page

Telerik UI for WPF

  • Telerik UI for WPF ships with support for the latest preview of .NET 5
  • New SearchTextBox feature: Support auto-filtering search results in real time
  • Dock control enhancements: New navigation commands, keyboard and mouse shortcuts, such as CTRL+Tab for switching between tabs and Ctrl+F7 for navigating  
  • New Slider feature: Multiple thumbs support 
  • New TimeSpanPicker feature: Set TimeSpan from text input, which the control will parse to a valid TimeSpan value
  • New WordsProcessing feature: Support for content controls 
  • New Office 2019 theme: Keep your apps in line with the latest trends of UI and UX with a brand new Office 2019 theme, available in all three colors variations—Colorful, Black and Dark Gray
  • Read More: Release blog post | product page

Telerik UI for WinForms

  • Telerik UI for WinForms ships with support for latest preview of .NET 5
  • Design Time Support for .NET 5: Design time support for all Telerik UI for WinForms controls enables for building .NET applications right in the designer
  • New TaskDialog control: Theme table and easily customizable alternative to the Windows TaskDialog
  • Vector images themes support: More themes will support vector images
  • Read More: Release blog post | product page

Telerik UI for WinUI

Telerik Reporting and Testing Solutions

Telerik Reporting 

  • New features in Web Report Designer—dedicated wizards for new WebService, JSON and CSV data sources
  • New WPF Report Viewer Theme
  • SVG images support
  • Read More: Release blog post | product page (Reporting / Report Server)

Telerik Report Server

  • New features in Web Report Designer—dedicated wizards for new WebService, JSON and CSV data sources
  • SVG Image support 
  • Report preview canceling
  • Read More: Release blog post | product page (Reporting / Report Server)

Telerik Test Studio Dev Edition 

  • Object Character Recognition (OCR) features
  • Manual DOM refresh and auto-refresh pause/resume inside the Recorder
  • Blazor support through ready-to-use translators for the most popular Telerik UI for Blazor components
  • Read More: Release blog post I Product page

Telerik JustMock 

  • Support for the latest preview of .NET 5 
  • Support for Code Coverage in JustMock Azure Pipeline Task for .NET Core
  • Support for Multiple Instance of Visual Studio for the DebugWindow functionality
  • Read More: Release blog post | product page

Updates in KendoReact and Kendo UI R3 2020 Release

Kendo UI Release R3 2020

Learn more about newly released gems in JavaScript product line below (or check out our blog post covering the entire Kendo UI line of updates)

KendoReact

  • New components: Gantt chart, App Bar, Text Area, Rating, Chip & ChipList, Badge and Loader 
  • Grid updates: Row pinning, customizable pager, column pinning through context and column menu
  • Editor updates: Insert image dialog, font color tool, background color tool, find and replace tool
  • New and improved documentation and demos for faster load times
  • Read More: Release blog post | product page

Kendo UI for Vue

  • New native components: ComboBox, AutoComplete and MaskedTextBox
  • Vue 3.0 support for the entire Kendo UI for Vue library
  • Read More: Release blog post | product page

Kendo UI for Angular 

  • New components: ListView, Loader, AppBar, Input, Breadcrumb, RangeSlider and Badge
  • Grid updates: New Cell Selection
  • Updated all applicable form components to work with form design guidelines
  • New and improved documentation and demos for faster load times
  • Read More: Release blog post | product page

Kendo UI for jQuery

  • New components: Wizard, Image Editor, Loader, App Bar, Pager and Text Area
  • Gantt updates: New Column Template feature, planned vs. actual comparison and new Column Menu options
  • Grid updates: Foreign Key Binding and Sticky Columns
  • TreeList updates: Item Selection
  • Scheduler updates: Revamped recurrence editor with added Section 508 and WCAG 2.0 compliance
  • Spreadsheet updates: Render cell with custom HTML
  • NumericTextBox updates: Select All Text on Focus
  • Read More: Release blog post | product page

Sign Up for the Release Week Live Webinars

Telerik Kendo UI Release Webinars from Sept 28 to Oct 2

Seeing is believing, so register to see all the new features—the webinars are coming up fast! It will help you to follow along easily if you download the latest release here.

Each webinar will be complemented with a Twitch session, where you will be able to see examples of using the new components and features and ask your questions to the speakers via the live chat.

Telerik Web Products R3 2020 Release Webinar

Live Webinar: September 28 @11:00 am – 12:00 pm ET

Save Your Seat

Twitch Session: September 28 @ 12:30 pm – 2:30 pm ET

KendoReact and Kendo UI for Vue R3 2020 Release Webinar

Live Webinar: September 29 @11:00 am – 12:00 pm ET

Save Your Seat

Twitch Session: September 29 @12:30 pm – 2:30 pm ET

Kendo UI for Angular and jQuery R3 2020 Release Webinar 

Live Webinar: September 30 @11:00 am – 12:00 pm ET

Save Your Seat

Twitch Session: September 30 @12:30 pm – 2:30 pm ET

Telerik Desktop and Mobile Products R3 2020 Release Webinar

Live Webinar: October 1 @11:00 pm – 12:00 pm ET

Save Your Seat

Twitch Session: October 1 @12:30 pm – 2:30 pm ET

Telerik Reporting and Testing R3 2020 Release Webinar

Live Webinar: October 2 @11:00 am – 12:00 pm ET

Save Your Seat

Twitch Session: October 2 @12:30 pm – 2:30 pm ET

The live webinars and Twitch sessions are a great opportunity to get your questions answered by the experts. We’ll be waiting to hear from you! Join the conversation on Twitter using the #heyTelerik and #heyKendoUI hashtags and on CodeItLive, our Twitch channel, via the live chat.

Thank You

We recently asked our customers to describe their experience with our tools and support. Thank you for the amazing responses! We were blown away and thought it would be fun to organize your responses in the language that binds us all together—code :). Here it is, using our customers’ own words. As always, you make what we do possible.

DevCraft Customer Words

About DevCraft 

Telerik DevCraft is the finest software developer tools collection across .NET and JavaScript technologies, which includes modern, feature-rich and professionally designed UI components for web, desktop and mobile applications, reporting and report management solutions, document processing libraries, automated testing and mocking tools from the Telerik and Kendo UI suites. DevCraft will arm you with everything you need to deliver outstanding applications in less time and with less effort. With the backing of our legendary support team, which consists of the developers who build the products, and a ton of resources and trainings, you can rest assured that you have a stable partner to rely on for your everyday challenges along your software development journey.


Automated Tests for Chart Elements With OCR and Coded Steps—an Uphill Climb or a Lift Ride?

$
0
0

Automating elements that contain dynamic and static data might be quite a challenging task for automation engineers. In this post we’ll explore next level test automation using Telerik Test Studio Dev Edition with its brand new Optical Character Recognition (OCR) features and will apply it to a Telerik UI for Blazor chart. We will take on some advanced coded approaches to solve more complex problems regarding data visualization (DataViz) and provider-based comparison.

Overview

Before we start, let’s clarify one thing. The purpose of this article is showcasing a scenario with a broader usage and creating a more generic approach for the modern-day automation engineer. That is why we will cover the present use case end to end with all the necessary details relevant to this approach, although in real life some of the steps described below could be simplified for this case.

The Use Case

Now, let’s take a look at the use case. As a QA engineer, I want to build an automated test case that verifies the data in a continuously changing Revenue report. 

Blazor Chart Demo Test Automation with OCR

The automation challenges I commonly will be facing are:

  • The report data is dynamic, meaning the chart will change often/every time the page loads
  • The data is aggregated, meaning each point needs to be validated against its backend source
  • The test case might need to be extended to cover additional requirements like cross-report support

How To

In order to find a solution to a complex problem, in real life we often need to split the problem into simple and workable steps. That is what we will be doing in our use case:

  1. Extract the data from the Blazor Chart
    • Understand the nature of the chart and how it works
    • Traverse the chart and extract the data
  2. Transform the data
    • Use Test Studio’s OCR recognition to extract the data for each point
    • Create a comparison model
  3. Compare the data integrity
    • Pull raw data from the DB/Service
    • Compare and validate each data point against its raw data/source data counterpart

For the purposes of the demo we are using a chart demo example from the Telerik UI for Blazor components. What we are interested in is each data point for the ‘Total Revenue’:

Test Automation of SVG Elements

From a DOM perspective each point is an SVG Circle element. SVGs are widely used for vector-type diagrams like bars, pie charts, scalable icons and logos—all together elements containing dynamic data that needs validation, which is well known to cause automation issues.

On mouse hover each circle updates a tooltip data window, which is visualized in the following figure:

SVG circle updates a tooltip data window

What we need to do is to hover over each ‘circle’ and collect the dynamically generated data. Note that as the time goes by the data points or ‘circles’ will change so we need to adapt our steps as static element find logic will be of no use in this particular case.

We will continue with the next steps inside Test Studio Dev Edition. Here you can download a free trial. Follow the steps in the Quick start guide in order to create your first project automating your web tests. All OCR features are also available in Test Studio Ultimate and Test Studio Web & Desktop.

In order to get started, navigate to the app under test and maximize the browser if needed:

Visual Studio Test

Now the third step in the test is of a more special nature as it will allow us to create a coded solution for our dynamic scenario. We will do a line by line explanation in order to make every step transparent. At the end we will summarize the entire test automation case. 

  • Make sure we are working against the latest DOM by refreshing the client-side DOM tree:
Code - RefreshDOM

  • Let’s find the Blazor Chart which is the topmost container control, represented by a ‘div’ HTML element:

Code - Find Blazor Chart

  • Now that we have the chart we need to drill down and find the ‘points group’ hosting each data entry. For the Telerik UI for Blazor Chart this is an SVG Group element (<g>) tagged by a specific ‘clip path’:
Code - PointsGroup - SVG Group Element

  • The <g> element contains all SVG Circle (<circle>) elements in the data series. Let’s get them: 
Code - Points - SVG circle element

  • Now we will hover over each point, expand the tool tip and use OCR to extract the data from it. In order to do that we will use simple C# foreach, the ‘MouseHover’ function and Test Studio’s most recently introduced OCR features: 
Code - PointsLoop - Mousehover Function

  • The ‘ExtractPointData()’ method is in fact what does the OCR work:
Code - ExtractDataFromPoint
  • Now we have a text which looks as visualized on the following figure:
Image Text Inspection
  • This is pointing us in the right direction of the demo, however we still have work to do, which includes trimming the text and transforming it to a comparable object. For this purpose, we will create a data holder class called ‘ProductPoint”. This class will have a built-in parser that will create an object based on ‘imgText’: 
Code - ProductPoint 
  • The last step in our data extraction journey will be to put all ‘ProductPoint’(s) in a single data array which will be used during validation. In order to accomplish this, we will use a simple generic List<ProductPoint> as shown in the following figure:
Code - ListDataPoints
  • We will finish our demo test case by validating the data. Depending on the backend, there are a few potential approaches. One will be to call the DB/DataSource itself, another one may include simply doing a REST call to a data endpoint. For the purposes of this demo case we will use a simple wrapper called ‘ValidationService’ with its single method: bool ValidateProductPoint(ProductPoint p):

Code - AssertLoop

Conclusion

That is about everything an automation engineer needs to do in order to cover this or any similar test automation case. It may not be the most elegant solution in all relevant cases; however, it follows a very broad and relevant approach that is applicable to a series of real-life scenarios. 

Learn More at Our Webinar

To learn more about all the latest features in Telerik Test Studio Dev Edition and see them in action, be sure to register for our Testing and Reporting Release Webinar on Friday, October 2nd at 11:00 AM ET.

Test Studio Dev Edition in Perspective

Test Studio Dev Edition is part of DevCraft Ultimate—the industry-acclaimed .NET and JavaScript developer tooling bundle enabling dev teams to build modern, high-performing web, mobile and desktop apps that deliver the exceptional digital experiences users demand.

Test Studio Dev Edition is also available as a Visual Studio Plugin as part of Test Studio Ultimate. With its successful blend of codeless and code-based automation capabilities in an intuitive UI, Test Studio enables testing anyone can use regardless of expertise. Test Studio Ultimate is used by both developers and QA’s, providing them the possibilities of automated testing in a standalone IDE, or within Visual Studio.

Request Demo

Responsive Web Design: The Vox Populi in the Age of Mobile

$
0
0

In today’s mobile-first reality responsive web design is crucial for building websites and applications successfully and meeting the growing demands and expectations of the mobile user. But how can you turn the repetitive tasks associated with making sure the responsive web design performs as expected into a story every QA would enjoy having on the Kanban board?

There is no point in starting by trying to convince you that the web is an incredible place, especially in the digital reality we are currently living in. In light of recent events, on March 25, 2020 Virgin Media announced that UK's coronavirus lockdown has doubled the UK's internet usage during the day. Around that same time, Business Insider reported that Akamai's web traffic monitor shows its networks are seeing 50% more web traffic than average.

Even though global networks are well prepared to accommodate such a traffic increase, there is more to that than just observing already expected growth. Our recent reality is changing how we interact with the world—professionally but also socially.

The Rise of Mobile Traffic  

Traditionally, the traffic on mobile devices accounts for nearly 60% of total internet traffic. If we add the traffic on laptops, it becomes evident that having access to the web from anywhere has gone beyond being a commodity. It is now a necessity. Moreover—Mobile is where the user-centricity has its natural habitat.    

In today’s mobile-first reality responsive web design is crucial for building websites and applications successfully and meeting the growing demands and expectations of the mobile user. Visitor retention, search ranking, web visitor interest rates and time on site all depend on responsive design, scaling well across browsers, screen sizes and devices. If we run an experiment and ask among a focus group of what each individual would prefer—downloading a mobile app or accessing that same app or site via the web browser, the majority will most probably choose the second option.

The Web is Where Customer-Centricity Feels at Home

If the customer is king, simplicity, convenience and speed is what rules the world of web. Nowadays, users are even more willing to trust a brand if their website’s design is responsive. The reasons behind are related to the expectation that a website will provide the same exceptional experience, no matter where it is loaded—on a 14" laptop screen, on a Galaxy Note 20 or on an iPhone SE, which with its 4.7-inch display qualifies as Apple's smallest available smartphone.

Seamless and uninterrupted user flow across devices is the paradigm, ensuring users are always able to continue browsing from where they left. One more reason to believe that ease of use cannot be compromised is the fact that the user's attention span is decreasing, which means that switching quickly between devices should not be at the expense of the uninterrupted experience, where responsive web design comes at hand.

Responsive Design for Exceptional Online Shopping Experience  

The benefits of responsive web design have proven to be countless, ranging from great flexibility, low development time and cost, through to improved SEO, lower bounce rate, and ultimately—the almighty user experience. In many scenarios the approach of designing a responsive web-based app instead of native mobile development might not just be a suitable solution but in fact far more feasible.

A typical scenario where responsive might unlock its full potential is ecommerce, with its unprecedented growth in the past few years due to the tirelessly rising trend of mobile shopping. Online stores or ecommerce websites however, more often than not aren't optimized for mobile. Adding the fact that it's less likely that users will download a native app just to make an online purchase scores plus one for responsive web design. Just think about how often you have downloaded a native Android or iOS application just because you saw an ad on Facebook and wanted to take advantage of that 50% Sale Deal to buy a t-shirt or a pair of shoes in your favorite online store.

Cutting to the Chase

Applications in responsive mode may have a different UI and features, and may behave quite differently depending on how the user interacts with the app. Here we don’t even want to start the gesture-based user interaction story—ensuring an app is behaving correctly under different form factors and is covering the huge variety of available screen sizes creates enough of a headache for app developers.

Testing the responsive design of an app is crucial to ensure the uninterrupted user experience is not at risk while developing an app, adapting it for responsive usage or simply delivering release-based app changes. Responsive testing, however, might be a cumbersome job as it often requires repetitive testing, switching browser modes or changing devices to cover different scenarios or form factors.

Well-Tested, Well-Behaving Responsive Applications—Or How to Give Your Responsive Website a Cocktail of Vitamins  

Responsive web design will only make sense if it brings more benefits in the specific use case than a native mobile app. Testing responsive web apps is somewhat difficult with the traditional complex mobile testing solutions. Test Studio, fairly graded as one of the easiest to use test automation solutions on the market, lives up to its reputation once again, thanks to its brand-new Responsive Testing features.

It is extremely easy to set up and start automating responsive web tests without additional configuration, coding or extensive training. Moreover—the user can now create responsive web tests using the same techniques they are used to from creating automated web tests with Test Studio. Simply choose in what form factor your website should operate and run the Recorder. The Recording as well as the Test Execution engine puts the browser in Device Mode. Record your scenarios in any screen size by either choosing from several predefined options or creating the ones that you need. When responsive tests are ready, simply add them into a functional test list. Choose a device from the test list settings and run it locally on your machine, remotely with the Scheduling functionality or ensure seamless integration into your preferred CI/CD environment.

Responsive Testing is available in Test Studio Ultimate and is supported on Chrome and Chromium-based Edge.   

Current customers can download the latest release bits, or give Test Studio a chance by downloading a fresh trial today.  

Try Test Studio

That’s Neat—the Perfect Way to Execute Responsive Web Tests on Multiple Simulated Devices

$
0
0

Testing the responsive web design of your app is often a cumbersome job, as it might require repetitive testing, switching browser modes or switching devices to cover different form factors. The ultimate goal with test automation however is increased productivity. The aim of this blog post is to provide you with a quick and easily reproducible approach on how to execute your responsive tests on multiple devices and the best and easiest way to get presentable results.

Hello, fellow testers! How are you doing?

You’ll certainly say long time no hear. Guilty as charged, but today I am excited to present you a new series of blog posts I am starting called That's Neat. The series is dedicated to unraveling the power of fascinating Test Studio features and how to use them best in your daily tasks.

Let me make you familiar with one really hot and neat Test Studio feature—Responsive Testing, which is one of our latest and greatest features from Test Studio's most recent release. Check out and learn more about the other exciting features Test Studio got equipped with as of the latest release.

Now let’s focus on Responsive Testing. I’m not going to demonstrate basic functionality such as how to create responsive web test with Test Studio, how to record responsive tests and execute them. For that purpose, we have quite informative technical documentation where you can familiarize yourself with the feature itself.

The test automation approach I will demonstrate could be summarized as follows:

  1. Use a sample test suite with responsive tests
  2. Execute separate tests against multiple simulated devices
  3. Create a test list for each simulated device
  4. Execute all test lists to test against all simulated devices or separate test lists for a specific device

Let's get started!

Use a Sample Test Suite with Responsive Tests

Having in mind that it is very unlikely for a user to download a native app to make just one online purchase, I believe online stores and ecommerce websites should be optimized for mobile and respectively the responsive web design should be tested thoroughly.

This is where our new Test Studio feature really shines. For the sake of this example I have prepared a sample suite containing responsive tests that can be executed against a public website testing its responsive readiness. Here is how it looks:

Use a sample test suit with responsive tests

Create a Test List for Each Simulated Device

Now what I want to do with this suite is to execute all tests against multiple simulated devices. If you are already familiar with Test Studio you probably figured out that the easiest way to do it is using a test list. This will be exactly my approach. I intend to create as many test lists for as many devices I would like to execute my suite against.

So, I am creating a test list and naming it after the executing device, in this case iPhone 11:

Create a test list for each simulated device

Execute All Test Lists to Test Against All Simulated Devices or Separate Test Lists for a Specific Device

For your convenience you can use the Add All button and you will not have to go and adding tests one by one.

Use Add All button for your convenience

Once you’ve created the test list go to the Settings and from the Responsive Web tab choose the appropriate device (iPhone 11).

Edit test list settings to specify device

Do the same for all test lists you are going to create and you are ready for execution, quite easy, right? 

In terms of the test list execution it is up to you how to proceed. Test Studio allows you to be quite flexible executing your tests. You can go ahead and proceed with local execution or you can take advantage of our Scheduling functionality and run your tests remotely. You can even integrate it in your CI/CD environment.

There are at least two benefits from the setup I have demonstrated:

  1. Structured results – it is very clear how your tests perform on the different devices, in case of a failure you can easily spot which is the problematic device. You can analyze your results from the Results tab or using our Executive Dashboard if you executed the test list through the scheduling. Analyze your results from the Results tab or using the Executive Dashboard
  2. Easy maintenance – Using the setup described above it is quite easy to maintain your existing tests. In case you need to edit or update an existing test case you simply go to the test case itself and perform the desired maintenance. Once you are done you can execute the entire suite on all your devices. It is that fast and easy.

How would you use responsive testing to improve your web tests? As always, if you have any feedback on this or anything else, please let us know in our dedicated feedback portal or feel free to let us know in the comments below.

You can download the latest bits from your account today to give this a spin yourself, or if you're new to Test Studio, click the link below to start a free trial of the latest version.

Try Test Studio

The Five Questions Every Unit Test Must Answer—An Interview with Eric Elliott

$
0
0

On this episode of React Wednesdays, we talk with Eric Elliott about the questions every unit test must answer and how to craft more modular, resuable and debuggable code.

Finally, Unit Testing is no longer that thing you said you’d eventually get to, and purposely avoid. Eric Elliott dropped a masterclass in testing, complete with demonstrations and live coding, covering things like “The Five Questions Every Unit Test Must Answer,” the importance of RITE, and how testing makes you a better software developer. Eric’s interview is rich with wisdom and clarity.

On our October 7th, 2020 edition of React Wednesdays, we hosted Eric Elliott, Jesse, and Sergio to discuss Unit testing in React. During the show, we discussed the finer points of Unit Testing and watched a live demonstration of building unit tests for a React application. This show was especially interesting to me and my colleagues at Digital Primates because we use Eric’s materials in our training program for new consultants who work on Enterprise React applications. The full recording of our show on React Unit Testing with Eric Elliott is available on YouTube.

Eric Elliott is a prolific author, mentor, advisor, and developer. As part of his work, he runs DevAnywhere, a live 1:1 remote mentorship program using video meetings with screen sharing and hands-on coding. Jesse is a member of the program and also serves as a mentor. Sergio is an active mentee in DevAnywhere and gives great code reviews.

React Wednesdays with Eric Elliott - and Baby Yoda

Eric opened the discussion with a concise masterclass in proper test design (1:51). Many developers agree testing is necessary, but don't yet understand how to write quality tests. Eric's advice is clear and approachable and would fit on a sticky note. React developers would do well to place this on their monitor for reference.

His first point is to make components testable through proper component design. React provides mechanisms to separate visual elements from business logic and state. Components with properly separated concerns are easier to test, and easier to use and reuse. He then explained the five questions every unit test must answer.

The Five Questions Every Unit Test Must Answer

Eric developed a mental guide to help software developers ensure they write tests of good quality. He summarized the points into five questions.

  1. What is the unit under test (module, function, class, whatever)?
  2. What should it do? (Prose description)
  3. What was the actual output?
  4. What was the expected output?
  5. How do you reproduce the failure?

He explains the thinking behind each point, as well as why each is important.

Another point for the sticky-note is Eric's acronym on the elements of a good test. This acronym is RITE:

  • Readable - Test should be self-explanatory.
  • Isolated for Unit tests - Tests have their own setup and state. No mutable items are shared between tests.
  • Integrated - Integration tests are also important tests to validate what happens when things are combined.
  • Thorough - Test all likely edge cases, error conditions, and boundaries. Consider writing the test first, then the code.
  • Explicit - Place all items required to undertake the test inside the test code (set up data, factory functions, tear down logic).

React Wednesdays with Eric Elliott - Good tests are RITE

Testing Made Me a Better Programmer

Many software developers who are new to testing have a hard time reconciling testing with their other work. At times, testing can feel orthogonal to writing the code that ships. Developers usually feel pressed for time and feel the urge to skip testing. I asked Eric to offer advice to developers who shared that sentiment (10:51).

Eric explained that writing testable code encourages modularity, and modular software is most often better designed and implemented. Modularizing the code for testing helps the software developer build software that is easy to maintain and components that are easier to use.

From the management perspective, Test Driven Development practices grow confidence in development teams to ship code with less fear that an unexpected side effect will impact production.

Further, Eric says a good test suite is the best technical documentation you can have because it is granular and guaranteed not to get out of sync with the code, unlike written documentation does. 

Live Demonstration

Jesse started a live coding demonstration of building and testing code (15:49). His example consisted of two components:

  • Component 1 - Takes in text via an input form
  • Component 2 - Displays accumulated text in list form+

We watched Jesse build the two components and add appropriate tests for the next 20 minutes. During the process, he and Eric explained the source code and the reasons and strategy behind each decision.

React Wednesdays with Eric Elliott - Live Testing

Jesse used RITEway, an open-source library for simple, readable, helpful unit tests that conform to the "Five Questions." RITEway forces you to write Readable, Isolated, and Explicit tests, because that's the only way you can use the API. The RITEway method of writing tests is very straightforward and easy to read. It also scales well as tests accumulate. RITEway looks to be a beneficial library to structure and run tests. If you are new to tests or are interested in RITEway, be sure to watch this segment. There are many interesting sections like:

  • Which selectors should you use?
  • What needs a test, and what does not?
  • What is the role of Behavior Driven Development (BDD)?
  • Is it really legacy code if it has tests?
  • What about testing Redux reducers?

React Wednesdays with Eric Elliott - Talking RITEway Testing

Unit testing is vital to ensuring high code quality. Unit testing also helps development teams maintain their feature shipping velocity. Even as the code base grows in size and complexity, the test coverage reduces unknown side-effects from code changes so software development teams can ship without worry.

To close out the show (56:14), I gave my impression that building unit tests with RITEway was very easy to do and didn't distract at all from the development work. Eric replied with what might be the most poignant advice:

The benefits [Of TDD] are monumental... I started to get a lot faster with TDD than before I started using TDD even though I'm writing two, three, or four times more code. It's not typing the characters out that is time-consuming. What is time-consuming about programming is thinking through what a component should do, how it should relate to other system components, and the system architecture. TDD helps you think through this process in a way to write more modular, more reusable, and more debuggable code. —Eric Elliott

We learned a lot from our time with Eric, Jesse, and Sergio and are glad to make the recording available for you on the React Wednesdays YouTube Playlist. If you'd like more information, check out Eric's book Composing Software, and Eric's YouTube Channel. If you’d like to stay current on topics like these, consider subscribing to the Enterprise React Newsletter. New issues come every two weeks.

If all of this sounds interesting and you are looking for a way to level up your testing and software development skills, check out DevAnywhere. Eric designed DevAnywhere to elevate professional developers to the highest levels of technical excellence. The mentorship offerings are suitable for anybody building JavaScript applications or leading JavaScript development teams. As an initially self-taught software developer, I appreciate how 1:1 sessions can adapt to fit particular needs.

React Wednesdays is a weekly, live show hosted by T.J. VanToll from Progress, and myself, Dan Wilson from Digital Primates. Each week, we have guests showing and discussing the most interesting topics in the React ecosystem. You can find information about the show, along with upcoming and previous episodes at the React Wednesdays website.

Why Should Regression Testing Be the Top Go-To Practice in Your Test Automation Strategy?

$
0
0

Looking for a simple answer to how to prevent software failures? Start by looking at software regression testing—a critical part of software development and one which we sometimes forget is a perfect test automation candidate. 

Software—we can’t live without but is it always easy to live with? At least once in our lives we have experienced software malfunctions causing thousands of flight passengers to be stranded due to software system downtime, or losing access to mobile data services due to software failure or simply being locked out of Social Media due to a software glitch. If we are looking for a simple answer to how to prevent such failures from causing million-dollar damage, we should start by looking at software regression testing as one of the most critical components of a solid product.

Albert Einstein once said:

“A clever person solves a problem. A wise person avoids it!”

Nowadays besides the pure software development companies, almost any other company has to deal with software to a certain extent. Software is literally everywhere—financial institutions, entertainment, real estate, medical care and pharma, automotive companies, universities, governments etc.

If you build software, it is unquestionably important/critical to assure that you maintain its high quality. The best way to assure this is through software testing. One of the components that is a key element of every testing approach and is essential for a good testing strategy is the regression testing. But how should we define regression testing?

So, What Is Regression Testing?

Software regression testing is the testing activity that is responsible for re-running functional and non-functional tests to ensure that previously developed, deployed and tested bits of software still perform as expected after a change.

The closest analogy with a real-life regression testing example I can think of is when you prepare your steak. You normally cook your steak with salt and pepper and always following your favorite recipe from your childhood. One time you decide to add a bit of different ingredients and put garlic and butter—this will cause a shift of flavor of your favorite meal. This would be a regression.

The same logic applies to software regression. Changes in the code while working on delivering a product increment may involve dependencies, defects, or malfunctions. Software regression testing targets the mitigation of these risks, so that the previously developed, deployed and tested code remains stable and operational after new changes.

Why Is Regression Testing so Important?

What do you think following examples have in common?

Windows Locks Out Non-Software Pirates, August 2007

For 19 hours on August 24, 2007, anyone who tried to install Windows was told, by Microsoft's own antipiracy software (called Windows Genuine Advantage) that they were installing illegal copies. If you'd bought Windows Vista, you discovered certain features shut off as punishment. The bug this time was both caused by a human mistake and quite classic: Someone accidentally installed a buggy, early version of the Genuine Advantage software on Microsoft's servers.

Nest’s Smart Thermostat Glitch, January 2016

Google’s Nest was brought down by a software bug during one of the coldest winter nights. The bug—which Nest developers didn’t find until it was too late—drained the device’s battery and deactivated the thermostat. A December software update was the cause, but even when developers fixed the problem, they were left with peeved customers who were less than happy to undertake the nine-step process to reboot the device.

Heathrow Disruption, February 2020

More than 100 flights to and from London’s Heathrow airport were disrupted on Sunday, February 16, 2020, after it was hit by technical issues affecting departure boards and check-in systems, leaving passengers with little information about their flights and limiting the use of electronic tickets.

As these examples, which are true, prove—software glitches sometimes cause costly and embarrassing problems, which highlights the importance of regression testing. If your software has to go through frequent modifications you should definitely spend some time thinking about how to prevent costly mistakes and ensure your product is stable and production ready by using software regression testing.

How to do Regression Testing?

The first step towards software regression testing is impact analysis. This is the process of analyzing the impact of the changes in the deployed application or product. It tells us about the parts of the system that may be unintentionally affected because of the change in the application and therefore need careful regression testing. Once we have done the impact analysis, we choose one of the three most common approaches to regression testing:

  1. Re-test everything. This refers to re-testing your whole system from top to bottom. Test automation suites such Test Studio offer the necessary regression testing tool to perform the majority of the regression tests in an automated, productivity-boosting matter. If your tests are well designed, stable, reliable and optimized for regression testing, this approach will reveal any unwanted regressions.
  2. Selective re-testing. In most cases, it makes sense to limit your testing scope to save time. One way is to re-test only the modified functionality and those parts of your application that are most likely to be affected by the recent changes.
  3. Test case prioritization. With limited test cases, it might be a good approach to try to prioritize those regression tests that could impact both current and future builds of the software.

Automating Regression Testing

Inherently, regression testing is both a time-consuming and a repetitive activity, which often leads to cutting it to the minimum—especially in smaller QA and testing teams with limited capacity. Manual regression testing is used on almost any product, especially early in development. However, despite being the most natural solution in many development environments, it is hardly efficient. This is when test automation comes to hand.

Due to its highly repetitive nature regression testing is an ideal candidate for test automation. Automated regression testing can take care of tedious repetitive tasks and free up time for in-depth exploratory testing, ensuring product increment delivery on time.

The easiest approach to get started with automated regression testing without costly investments and heavy implementation is through using test automation tools. These tools, which with their productivity features are designed with all of the above challenges in mind, help automate web and desktop applications while eliminating technical debt and test flakiness.

Telerik Test Studio is an enterprise UI test automation solution for web, desktop and responsive web applications. It enables QA and test engineers to build powerful and reliable automated tests faster and with fewer hurdles.

Going for codeless test automation or using Test Studio’s code-based automation capabilities—you decide. Whichever approach or blend of both you choose, you’ll always ensure optimal app quality and deliver outstanding automation results for internal and external teams, customers and end users.

Test Studio provides all the necessary features in an all-in-one regression testing tool for your website or WPF application. It integrates easily in any team due to its easy-to-use interface and capabilities, enabling QA engineers and teams, regardless of their technical background or skillset.

Conclusion

Regression testing is essential in maintaining a high quality product and user experience especially when the regression scope grows bigger late in the development cycle. Regression testing tools such as Test Studio can help you easily identify all defects in the early stages of the cycle, and when used with an effective regression strategy, can save you and your organization time and money.  
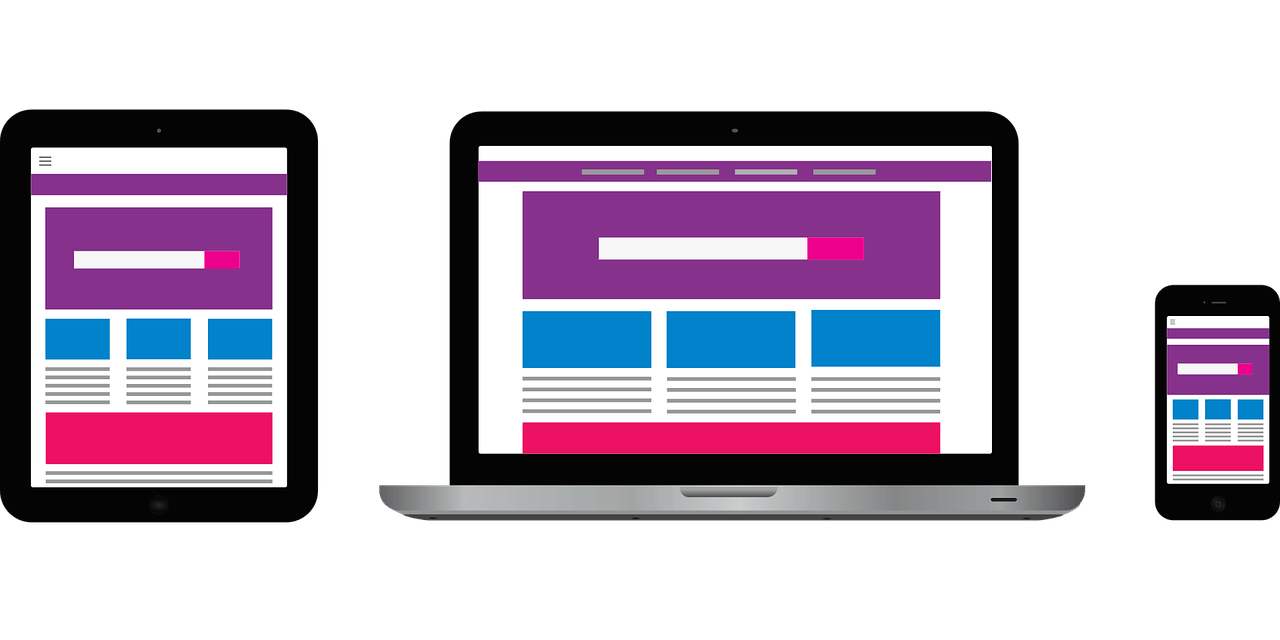
Try Test Studio
Viewing all 339 articles
Browse latest View live